AllianceBridge EWC <-> Ethereum
AllianceBlock Bridge Tutorial — Getting Started, Bridging Tokens and More
The AllianceBridge has successfully built out, tested and audited its seamless and fully decentralized blockchain interoperability platform and is now available on mainnet since July 12, 2021. You can use it here and view their announcement here.
AllianceBridge enables applications built on different blockchains to communicate with and interact with each other, something which was never before possible, therefore unlocks a groundbreaking development for the blockchain space as a whole. On launch, Energy Web, Ethereum, BSC, Avalanche, and Polygon — five of the leading blockchains and protocols — are supported, with capabilities to add new blockchains built-in to the AllianceBridge protocol.
Unlike most bridges that have a centralized relayer and/or have direct control over tokens (eg. using pools on each network so that they don’t need to wrap the tokens to bridge); AllianceBridge does everything completely decentralized, using the Hedera Consensus Services.
How is this different? AllianceBridge is governed by a set of validators. It has a novel synchronisation mechanism based on Hedera Hashgraph Consensus Service. This allows the validators to synchronise in a decentralized way instead of a heavy and slow “gossiping” protocol.
What impact will it have? This bridge will likely be cheaper and more effective compared to any other bridge due to the lowered technological overhead. It will enable more efficient interblockchain token (and in the future data) transfers. In addition, this will enable further synergy inside and outside AllianceBlock’s ecosystem, enabling more and more cross-chain integration and unique products.
Why is it open source? Open source drives the blockchain space forward. We are firm believers that an open code is beneficial for the project and for the community.
What are Validators? Starting with three validators, there is not one entity that has direct control of the tokens. Without centralized relayers, AllianceBridge is much more secure, faster and fully transparent. A validator, sometimes called a bridge operator, is a node observing the bridge’s transactions in the source network and signing it off so that the recipient network can safely receive these and create the wrapped tokens.
Currently, the Alliancebridge has three entities being bridge validators with the intention to add more entities:
AllianceBlock
LimeChain
Faculty Group
Check the full audit report at: https://omniscia.io/alliance-block-multitoken-bridge/
Getting started
The AllianceBridge accepts $EWT
Using the bridge rewards the bridge validators with the Allianceblock token ($ALBT) or native Energy Web token ($EWT). Fees are kept as low as $1
Prerequisites
Make sure you have MetaMask installed and the Energy Web network added.
You can the Energy Web MetaMask configuration toolbox or Chainlist in order to add new networks with just a few button clicks or use
MetaMask will then popup, press "Approve" button to finalize adding the network to MetaMask. You don't have to switch network afterwards in case MetaMask asks.
Handling fees
In order to bridge tokens from one network to the other fees need to be paid two ways:
Transaction fees to the network in their native token: - ETH for Ethereum Mainnet - EWT for Energy Web - MATIC for Polygon Network - AVA for Avalanche - BNB for Binance Smart Chain
ALBT fees for the Bridge: - ALBT for Ethereum Mainnet - WALBT for all other networks (the bridged version of ALBT)
The transaction fees to the network are depending on the network itself and likely tied to how congested the network is or isn't. The transaction fees to the bridge are always set to 1 ALBT/WALBT. This means you will always need to have ALBT in your wallet in order to pay the bridging fees, no matter the token you bridge.
Important note: do not use the AllianceBridge to bridge tokens that are native on one of the supported networks.
For example, if you have ERC20 MATIC and you want to have native MATIC on the Polygon network in order to pay the fees for claiming the bridged tokens, you cannot bridge your ERC20 MATIC to Polygon, it would create wMATIC on the Polygon network, not the native MATIC token that is used to pay the fees. In order to bridge these native tokens, use officially supported bridges or buy them on the network itself.
List of ALBT token addresses on each network
Ethereum Mainnet ALBT: 0x00a8b738E453fFd858a7edf03bcCfe20412f0Eb0
Energy Web WALBT 0x78B745b71cd53347335BEC9A2601703AcF689162
Binance Smart Chain WALBT: 0x42f3008F6945f052C31e7680F7f78c512099b904
Polygon WALBT: 0x35b2ECE5B1eD6a7a99b83508F8ceEAB8661E0632
Avalanche WALBT: 0x9E037dE681CaFA6E661e6108eD9c2bd1AA567Ecd
Bridging tokens
Warning: do not bridge $EWTB from Ethereum back to Energy Web. You'll end up with another wrapped token representing $EWTB; it will not unlock native $EWT If you need to bridge $EWTB back to Energy Web, you'll need to use the legacy bridge (one way) https://bridge.energyweb.org/
In order to show the steps needed in order to use the bridge, we will bridge ALBT from Ethereum Mainnet to Binance Smart Chain (also Mainnet). The steps will be the same as from any network to any other network, but we will take these two networks as a clear example.
Getting connected
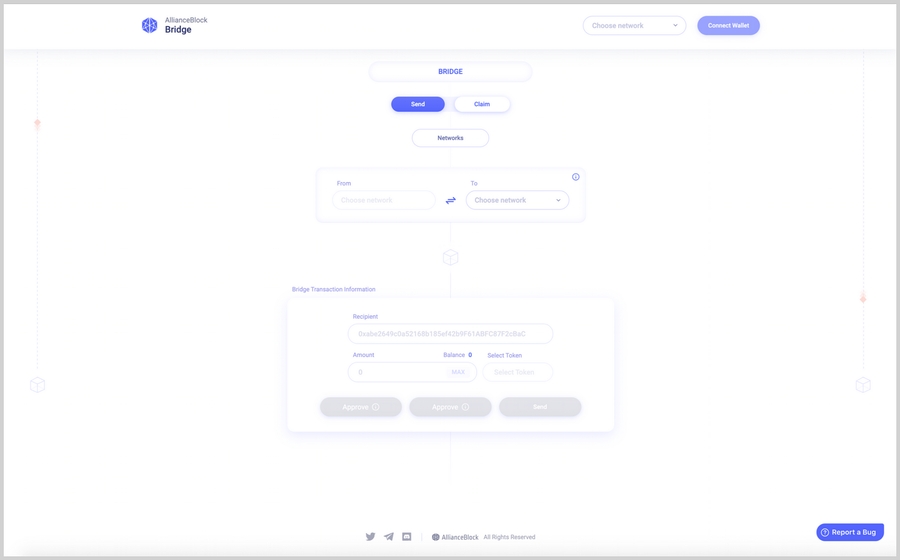
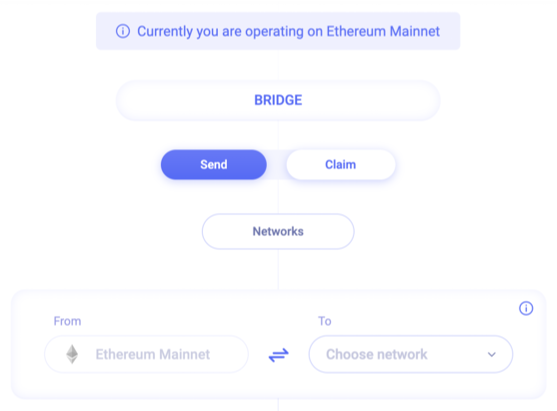
First of all, make sure you go to the official AllianceBridge website at https://alliancebridge.io/. You will see the following appear:
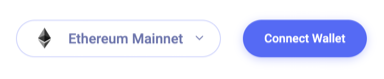
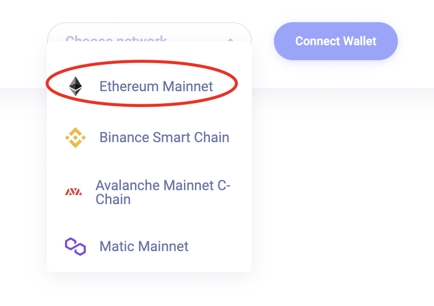
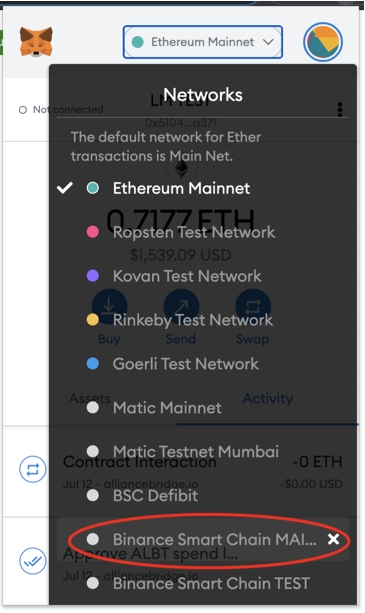
In order to be able to connect a wallet, you will first need to select your starting network, so in this case, we will start with Ethereum, as we want to bridge from Ethereum to Binance Smart Chain. Click "Choose network" on the top right of the screen and then select "Ethereum Mainnet":
Then proceed by clicking Connect Wallet button next to where you selected the network:
MetaMask will pop up and will ask you with which wallet you would like to connect. Choose the wallet that has the ALBT that you want to bridge to Binance Smart Chain.
If everything is connected correctly, you should see the following (but with your wallet address):
Sending your tokens to the Bridge
A bit below you have several options, let's look at them step by step:
The first part shows the current select network, which should be Ethereum Mainnet if you are following this tutorial step by step.
The second part exists out of the "Send" and "Claim" buttons. When clicking one of those buttons, the user interface toggles between the Send and Claim interface, by default the Send interface is selected (as now). The Send interface is meant to send your tokens from the current network to your target network. The Claim interface is meant to get your tokens from the target network.
The final part that is relevant to this step in the tutorial is to allow you to select the target network.
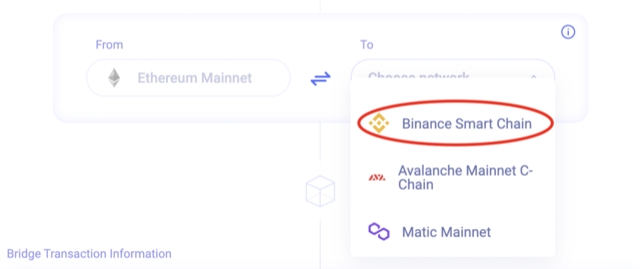
Let's change the target network (under "To") to "Binance Smart Chain":
Now it's time to look at the second part of the UI step by step again:
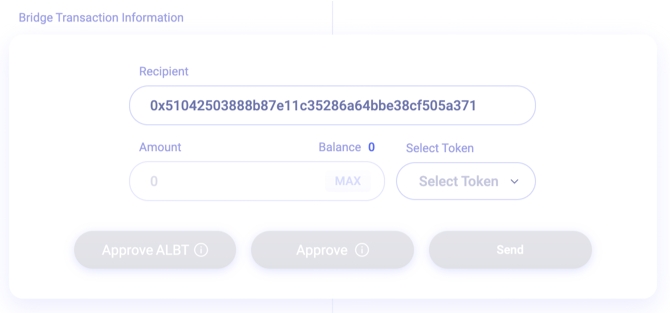
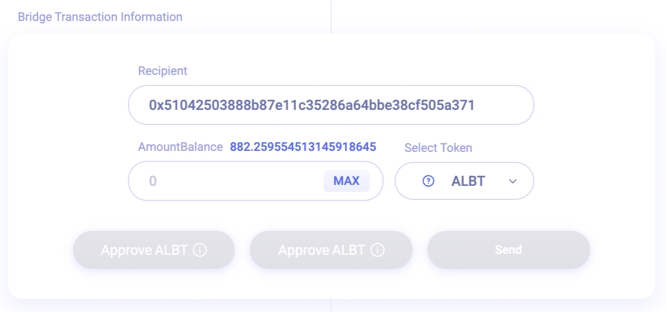
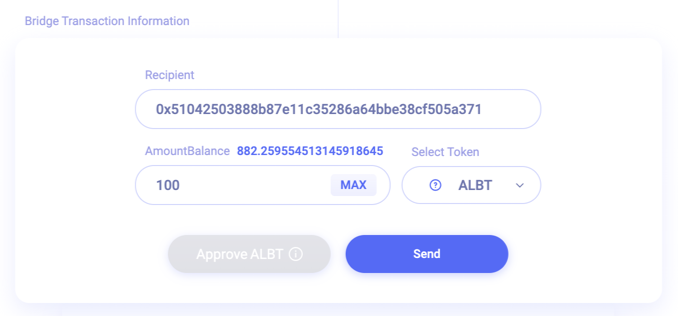
The first part is the recipient, it's set by default to your current connected wallet. It's easiest to leave it like this so you don't have to switch wallets between networks.
The second part is the amount of the token you want to bridge (with your current balance of that token above it) and then a dropdown you'll have to use in order to select the token you want to bridge.
The buttons are to Approve the ALBT (to pay the fees), another Approve button for the Token you want to bridge (will disappear if you will bridge ALBT, as you would already need to approve it). Approving is important to allow the smart contract to spend the token from your wallet, otherwise, the transaction won't work. The last button is the Send button, which will actually bridge your token to the target network. Note: you'll only need to approve a token once per wallet.
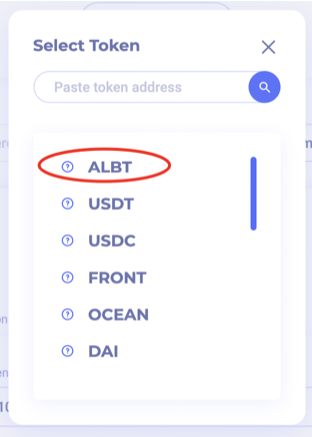
As mentioned before, let's keep the recipient as it is and select ALBT as token to bridge. Click on "Select Token" and select ALBT:
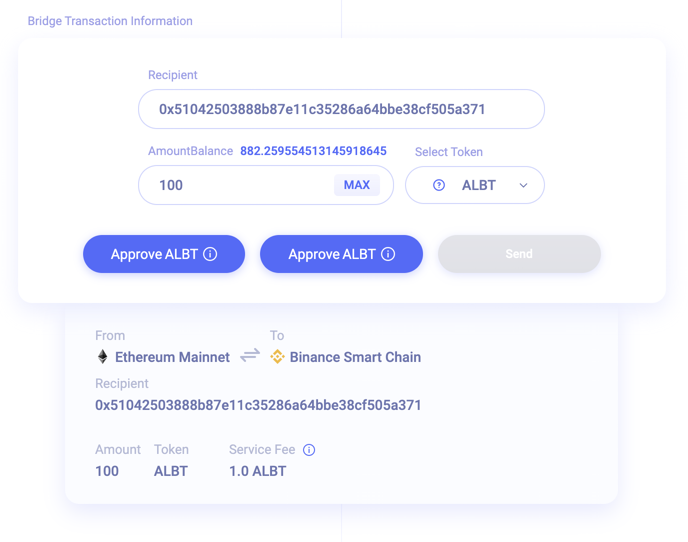
The UI will now update and show your balance of ALBT:
Let's enter the amount of ALBT we want to bridge, in this example we will bridge 100 ALBT to get 100 WALBT. Once you input the 100 ALBT, you will see new information below with more information about the transaction you are about to make:
As stated before, you'll first need to approve the contract spending the ALBT, you can click the first "Approve ALBT" button and Confirm in MetaMask. Don't worry, you'll only have to click one, the second one will disappear automatically once the first one is completed.
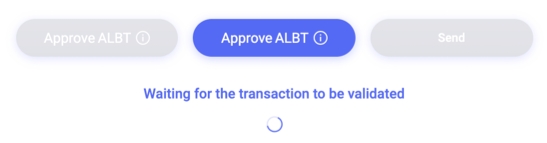
You will see a loading indicator while the transaction is processing:
Once done, the second Approve button is disabled and the Send button gets enabled:
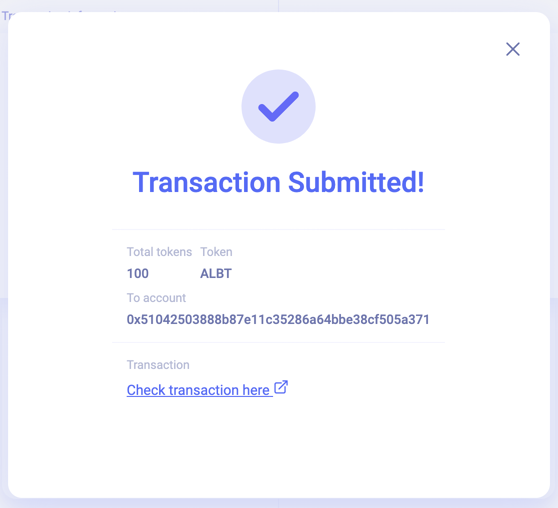
Let's press Send in order to send the tokens to the bridge to get ready for the last step, claiming the tokens from the target network! Confirm again in MetaMask and wait for the transaction to complete. You can also follow the transaction by clicking on the "Check transaction here" link below:
Claiming your tokens on the target network
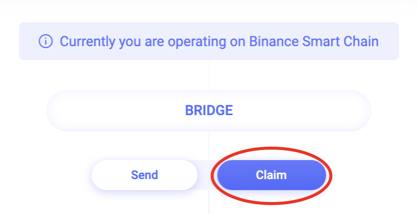
Important note: in order to claim your tokens on the target network, you will need to have the target network's native token in order to pay for the transaction fees. In this example with BSC (Binance Smart Chain) being the target network, you will need BNB in your wallet on the BSC network. You cannot use the AllianceBridge to bridge BNB (or other "native" tokens that are used to pay network/transaction fees).
In order to claim your tokens, you will need to switch networks in the Bridge UI, MetaMask and change the Bridge UI to the Claim page, let's check this step by step:
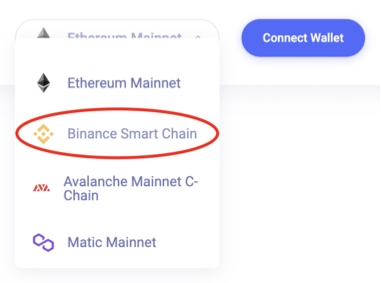
First, go to MetaMask and change network on top to Binance Smart Chain Mainnet:
Then do the same in the Bridge UI (top right):
And press the Connect Wallet button next to it:
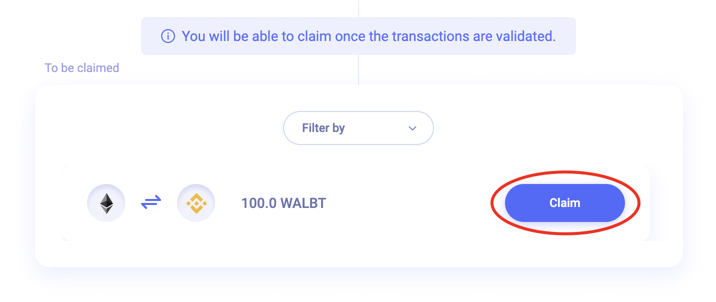
Now click the Claim button:
The UI will change below and should already show your bridged tokens. If you don't see the bridged tokens, it might take a few seconds before they show up (the UI auto-refreshes every 15 seconds). If still nothing, please check if you have connected the same wallet as you have specified in the "Recipient" field earlier.
Click the Claim button to execute the transaction to receive the bridged WALBT tokens in your wallet:
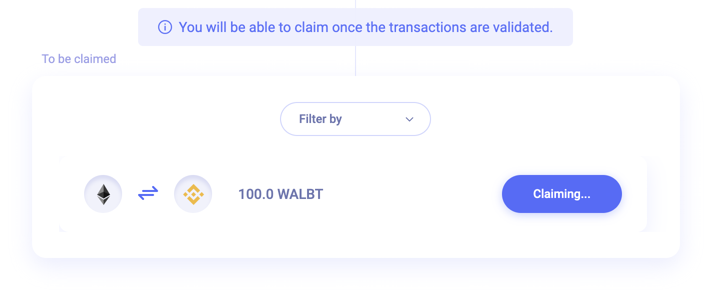
MetaMask will pop up, click confirm. The Claim button will then change into "Claiming…" until done:
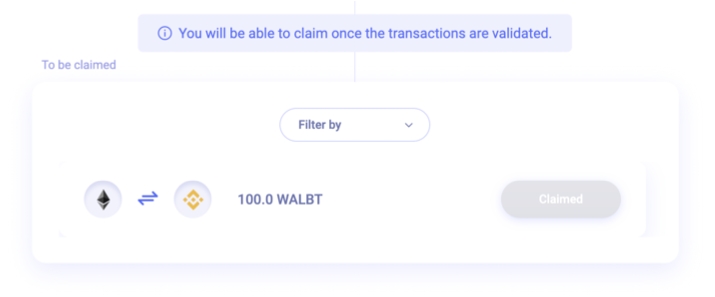
Once done, the Claim/Claiming button will be greyed out:
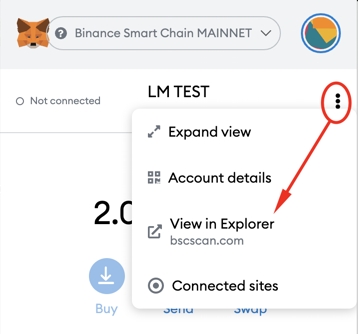
You will now find your tokens in your wallet. Not sure how to see them? Open MetaMask, click the 3 vertically stacked dots on the top right and click "View in Explorer":
This will open the BSCScan website for your wallet. You can click the BEP-20 Token Txns tab and you will find that you have received your WALBT tokens!
That's it! You have successfully bridged ALBT from Ethereum to WALBT on BSC
Last updated