Digital Spine Integration Client Deployment Guide - from Azure marketplace
This guide demonstrates how to launch a Digital Spine Integration Client (DSI Client) instance from App ‘Digital Spine Integration Client by EnergyWeb’ on the Azure marketplace.
The public Digital Spine Integration Client and associated message broker service is currently offered free of charge for Energy Web Member organizations and on a free trial basis for non-members. Please note that the message broker is rate-limited in the free version, and thus may not be suitable for high volume / high frequency data exchange use cases. For assistance in configuring a custom DSI Client and Message Broker solution for your organization, please fill out this form.
Things to know before you start:
Each section of this guide is demonstrated in a short video clip and accompanied with step by step instructions.
Integration and identity access management (IAM) for the DSI Client is performed with Energy Web's self-sovereign identity technology stack (i.e DIDs and verifiable credentials). To manage your DID you will need a Digital Wallet and Metamask, with a minimum balance of 0.1 EWT, to execute IAM transactions in the Switchboard application including requesting roles and publishing credentials to your DID document. You can read more about Switchboard and IAM processes here.
NOTE: Sending and receiving messages via the DSI Client Gateway does not directly use or interact with the Energy Web Chain; you do NOT need EWT to send and receive messages. EWT is required only for the IAM and enrollment processes.
You need an active Azure subscription to access the DSI Client via the Azure marketplace. Additional cloud providers and self-hosted options will be available later in 2023.
You will need access to one of the following Secret Engines, with full Read & Write privileges required:
- Azure KeyVault (Vault URI, Service principle’s appId, password, tenantid)
- Hashicorp Vault (Vault URI, access token)
Contents
1. Prerequisite Check
1.1. Configure MetaMask settings
To integrate the DSI Client with the Energy Web-hosted message broker, you will need to acquire and manage roles on Switchboard (https://switchboard.energyweb.org/). Metamask is used to log into the Switchboard dApp and sign transactions.
We recommend using Chrome (or Chromium-based, e.g. Brave) or Firefox desktop browsers to interact with the Switchboard dApp. To download MetaMask plugin to your browser, you can use the links below;
Chrome (or Chromium-based): https://chrome.google.com/webstore/detail/metamask/nkbihfbeogaeaoehlefnkodbefgpgknn
Go to Settings > Networks and click Add Network button to add Energy Web Chain. Enter the details below to add Energy Web Chain as a new network.
Network Name |
Energy Web Chain |
New RPC URL |
Chain ID |
246 |
Currency Symbol (optional) |
EWT |
Block Explorer URL (optional) |
You can also use ChainList to quickly add Energy Web Chain as a new network to your MetaMask. To use this tool, please follow this link and click “Add to MetaMask” button.
Select Energy Web Chain from the dropdown (by default, the Ethereum Mainnet will be selected) before navigating to the Switchboard dApp homepage.
1.1.a Funding Account
The Switchboard dApp does require users to use Energy Web Tokens (EWT) in order send transactions, sign messages or acquire credentials on the Energy Web Chain.
To learn how to acquire EWT in your wallet, click here
1.2. Secret Engine credentials
Azure KeyVault
Suppose you have a role-based-access-control service principle (sp) created, which is granted full Read and Write permissions to the KeyVault, your sp details may look like
You will need above details and the KeyVault uri on the resource creation page.
Learn more about
Hashicorp Vault
You just need
vault server url
The access token
2. Resource Provisioning.
2.1 Launching Digital Spine Integration Client instance
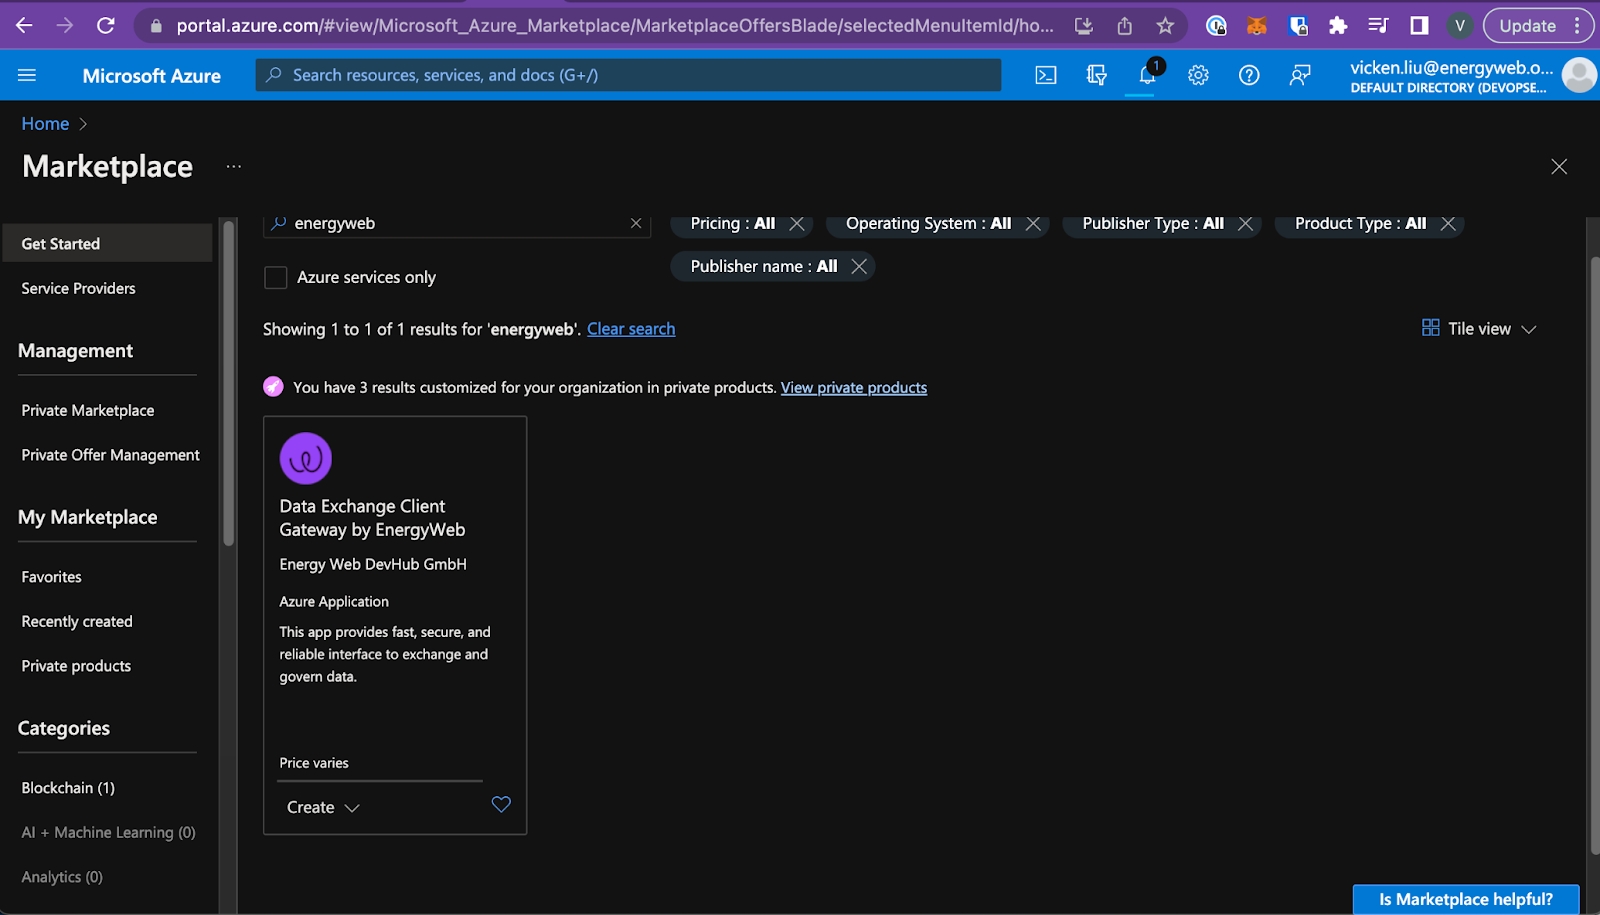
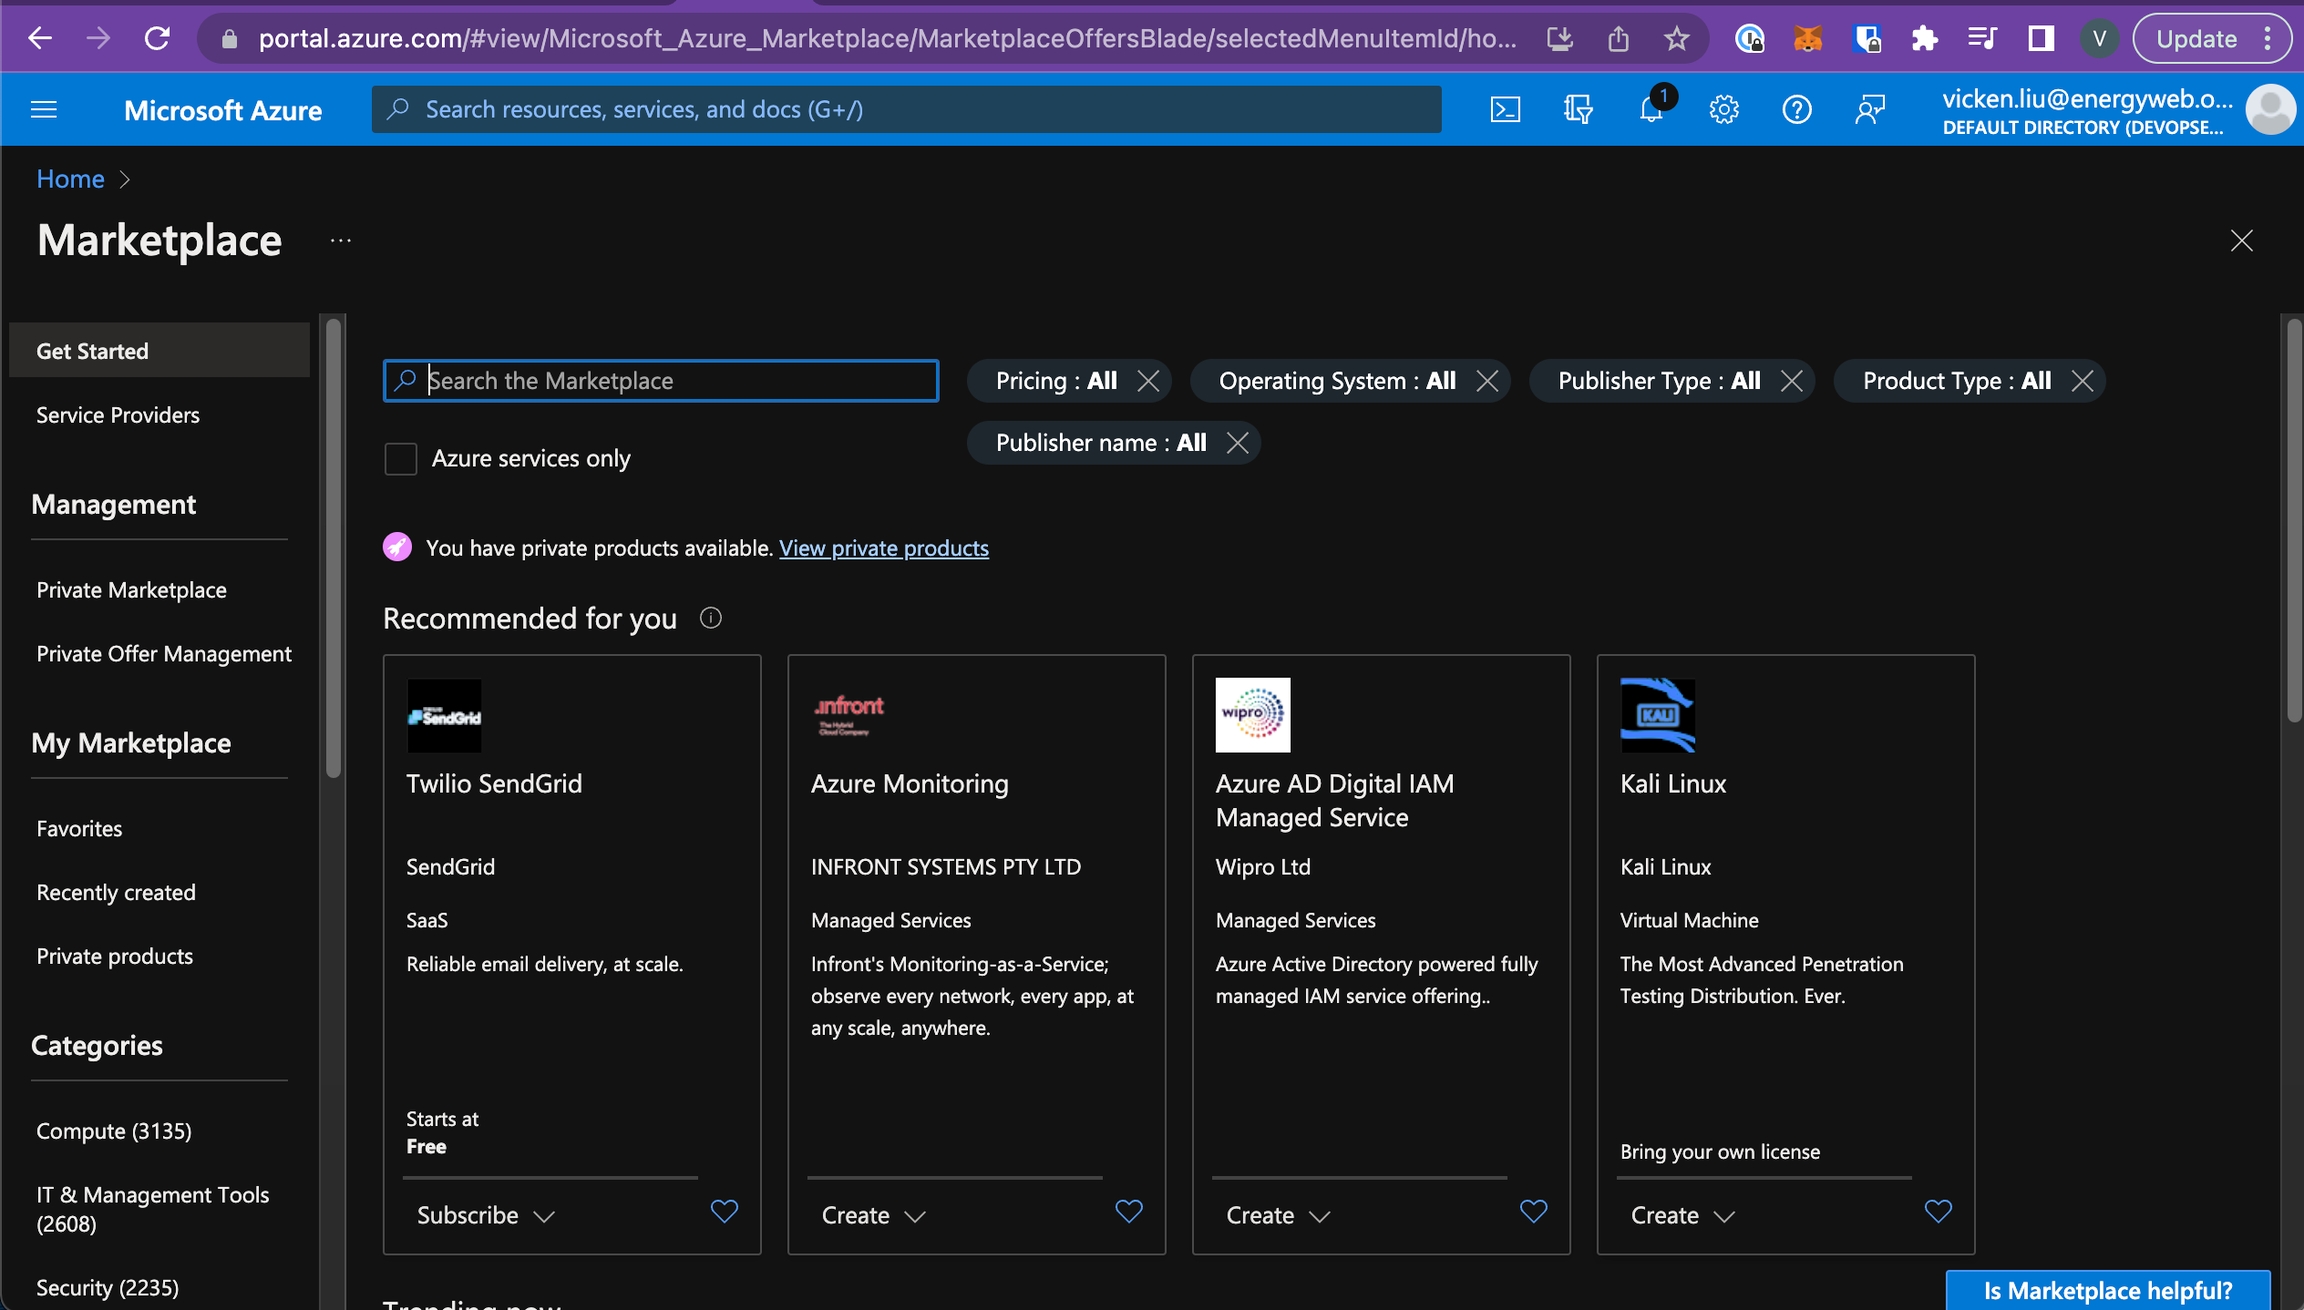
Login to Azure portal and go to ‘Marketplace’ page.
On the marketplace page, search ‘energyweb’ in the search box as shown below:
You will see the ‘Digital Spine Integration Client by EnergyWeb’ in the search results.
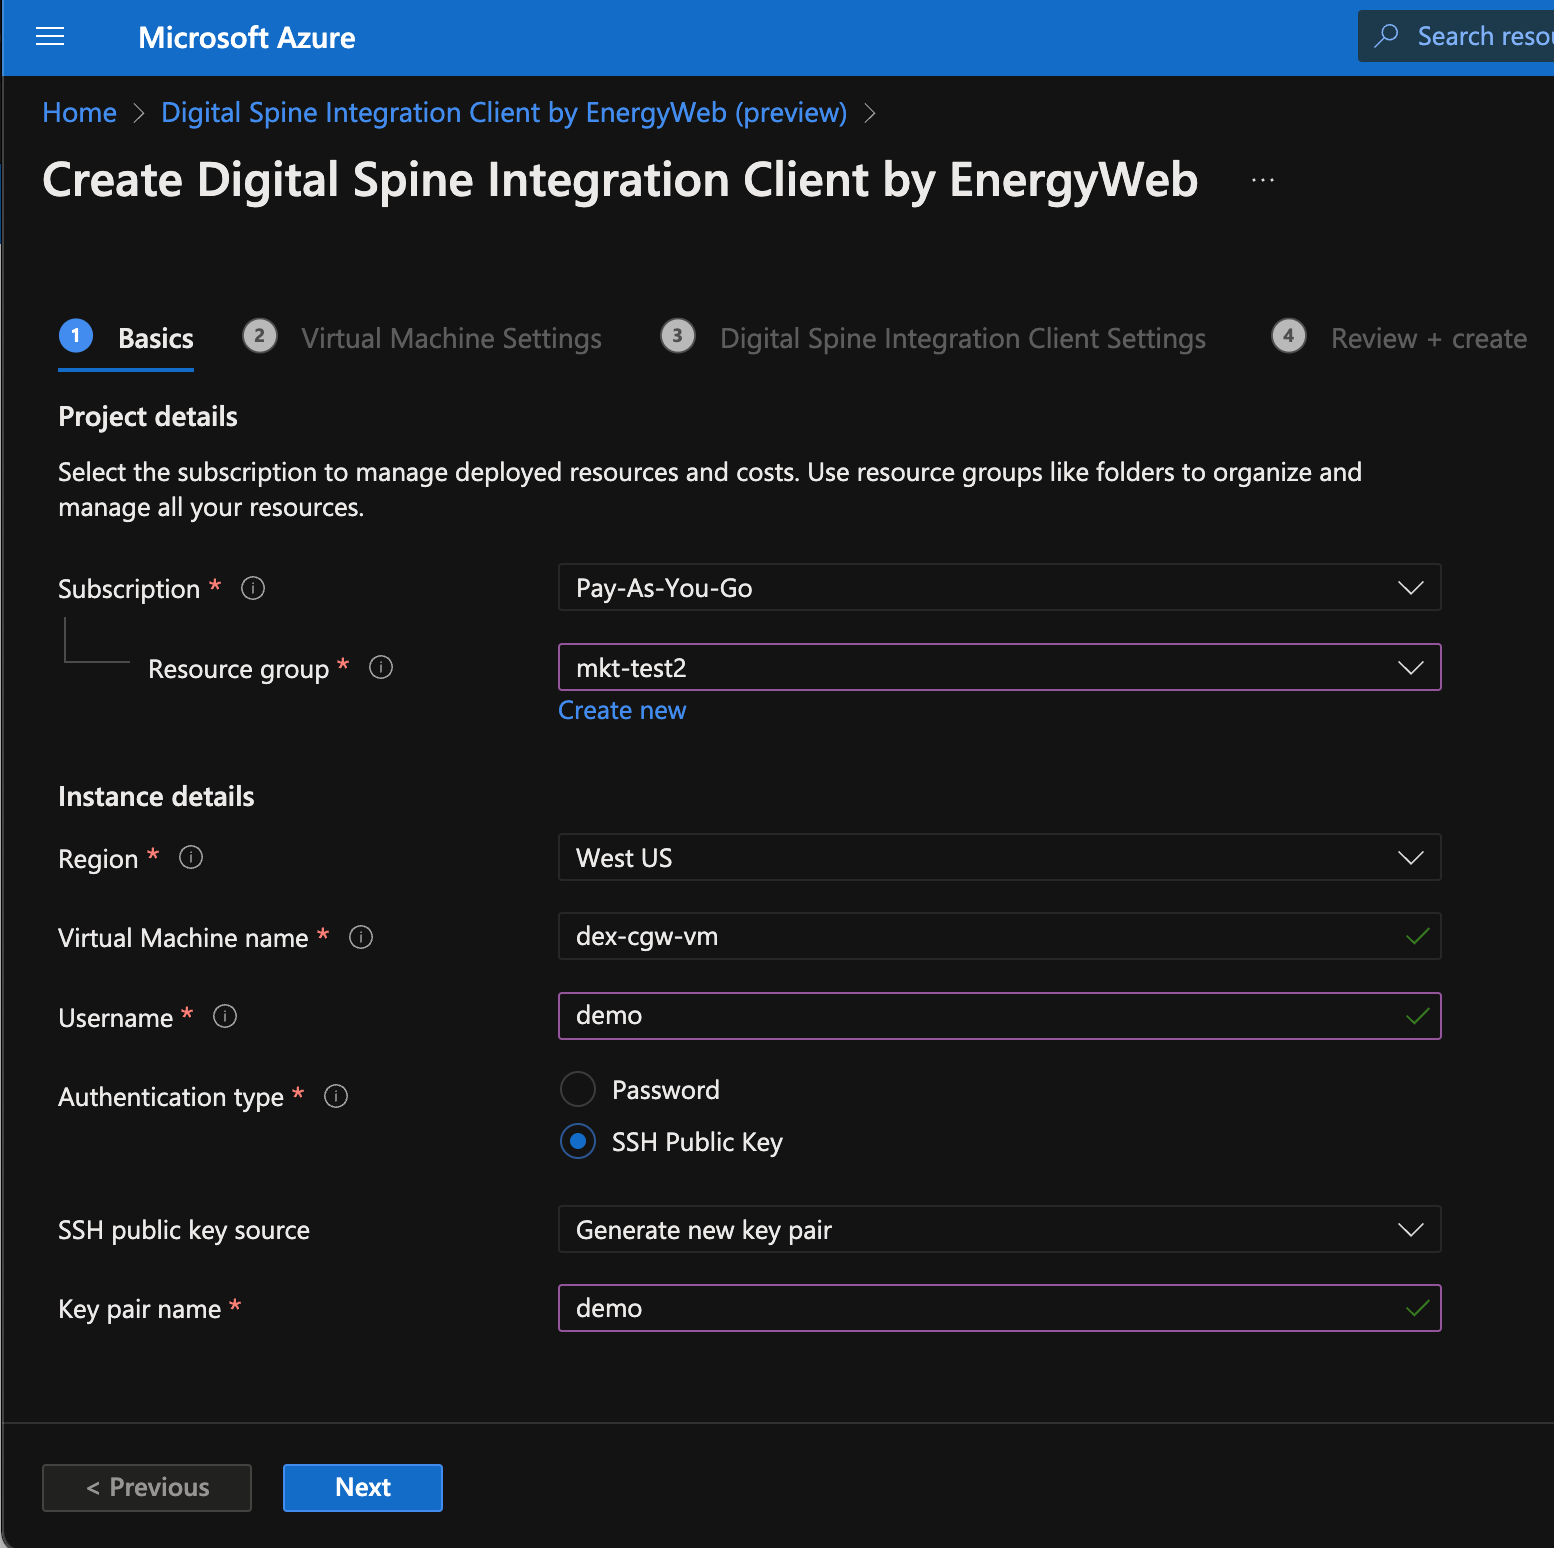
Click ‘Create’ on the Offer tile. It will take you to the resource creation page.
Follow the user guide on the UI to fill in the required fields for ‘Basics’ and ‘Virtual Machine Settings’.
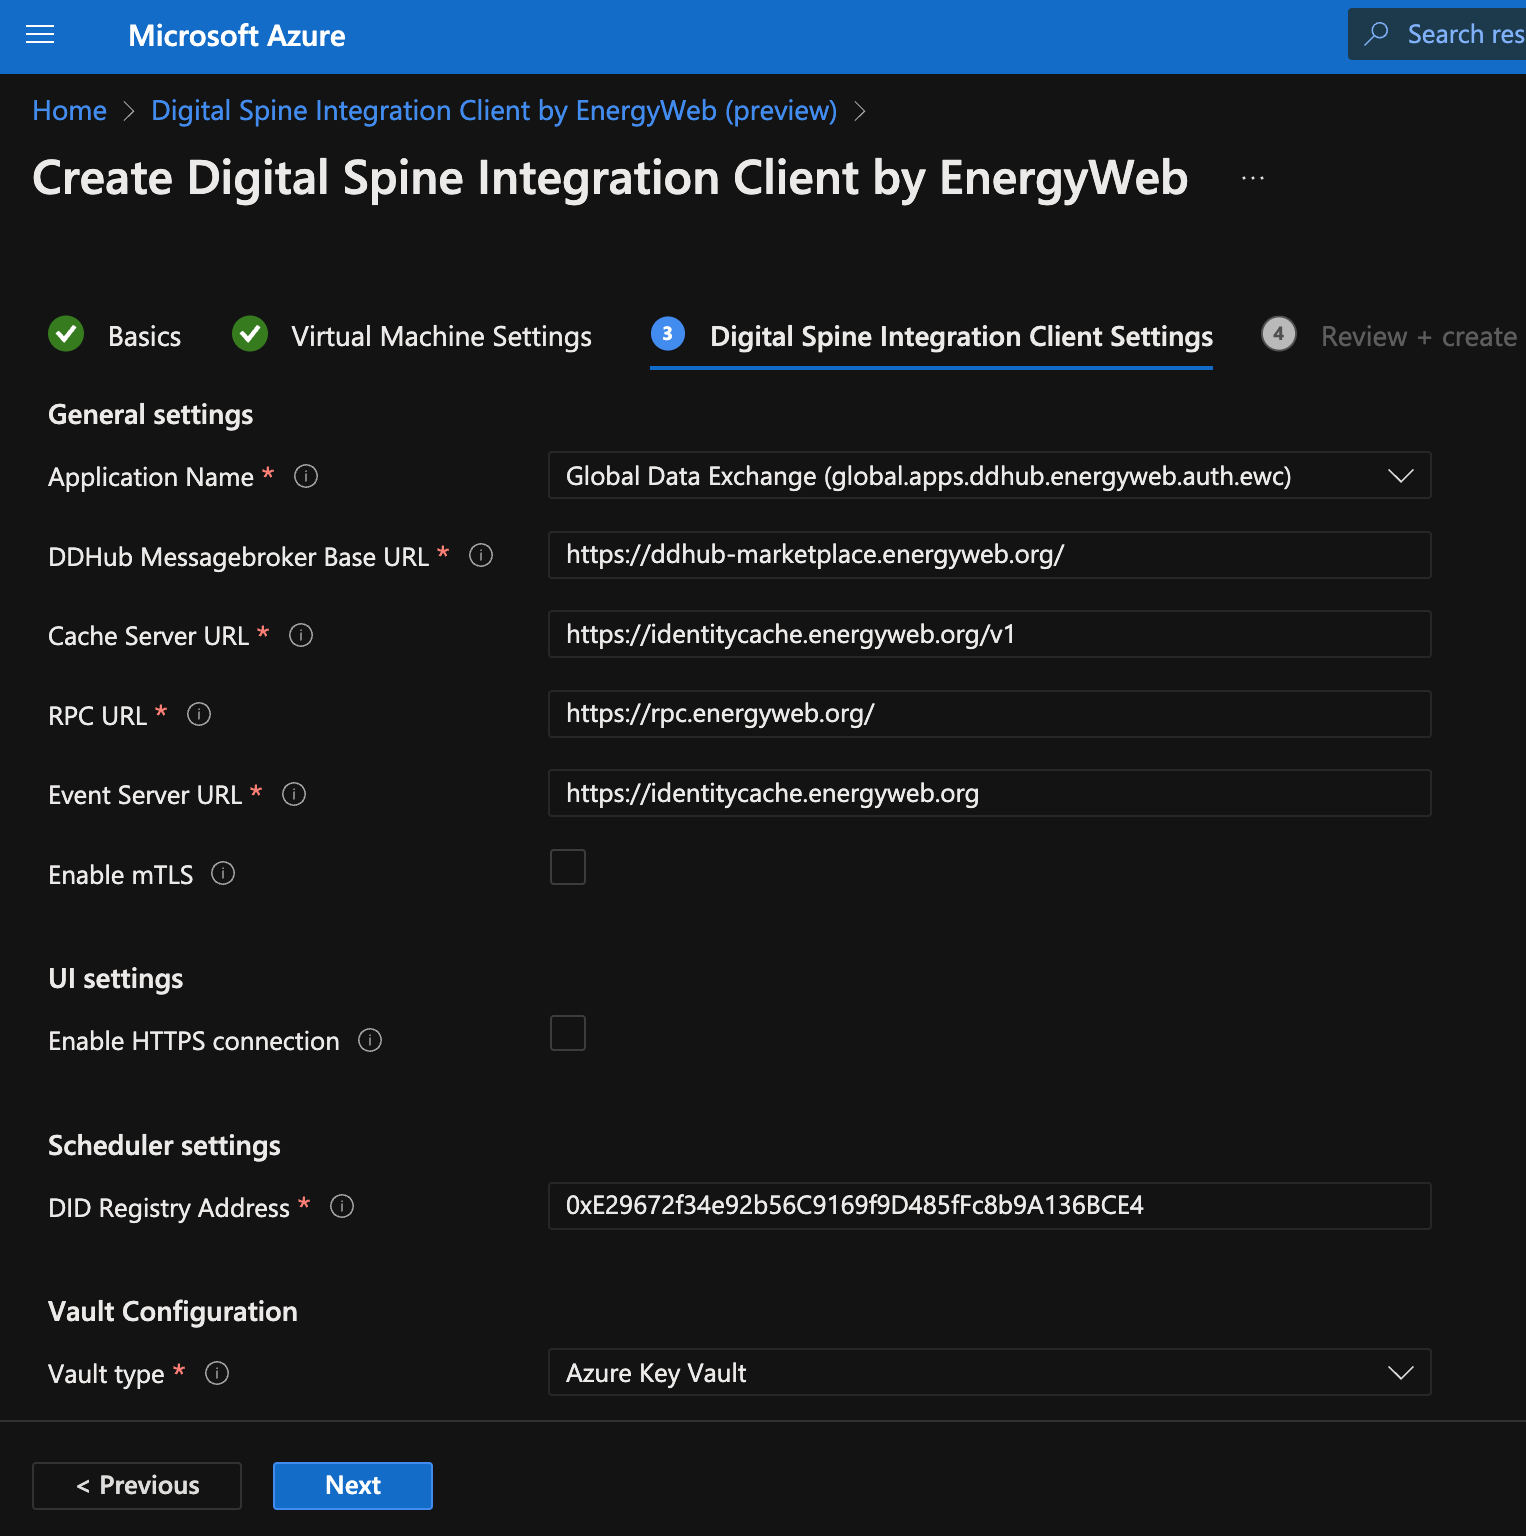
On the ‘Digital Spine Integration Client Settings’ tab, you can set the configuration for the DSI Client.
Most configurations are pre populated, you just need to select the desired application to integrate with from the `Application Name` dropdown .
There are 3 applications to choose from
Global Data Exchange
Greenproofs
Open Charging Network
If you want to run any other applications, you need to make sure the application is available on the EWC chain. Or feel free to contact digital-spine.support@energweb.org for assistance (responses are within 1-2 business days)
If you are an Energy Web member organization, you can also use the Member Slack channel #digital_spine.
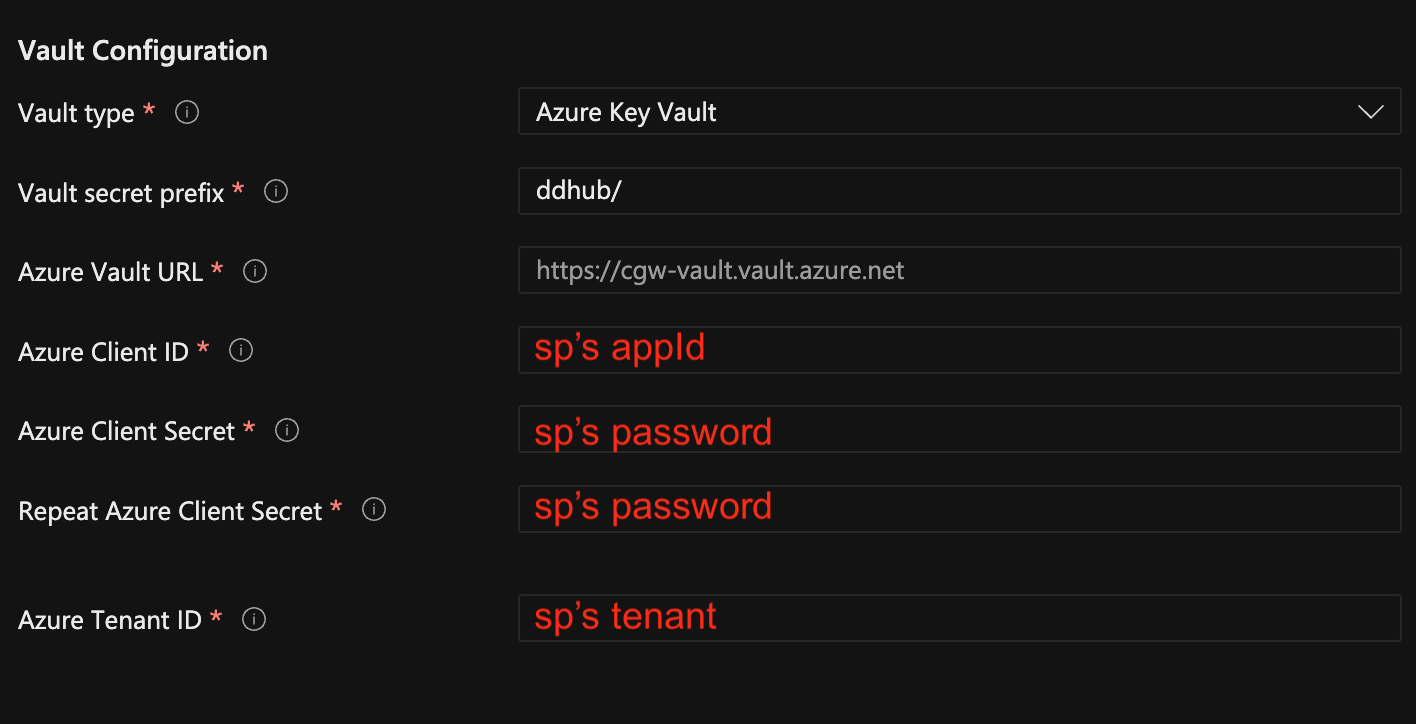
At the 'Vault Configuration' put in the secret engine details, below is the example for KeyVault.
The VM you are creating must have access to the chosen Secret Engine from a network perspective.
Once all the required fields have been filled. You can proceed to ‘Review + create’ tab, you can double check all the inputs. Then click ‘Create’ to start creating the resources.
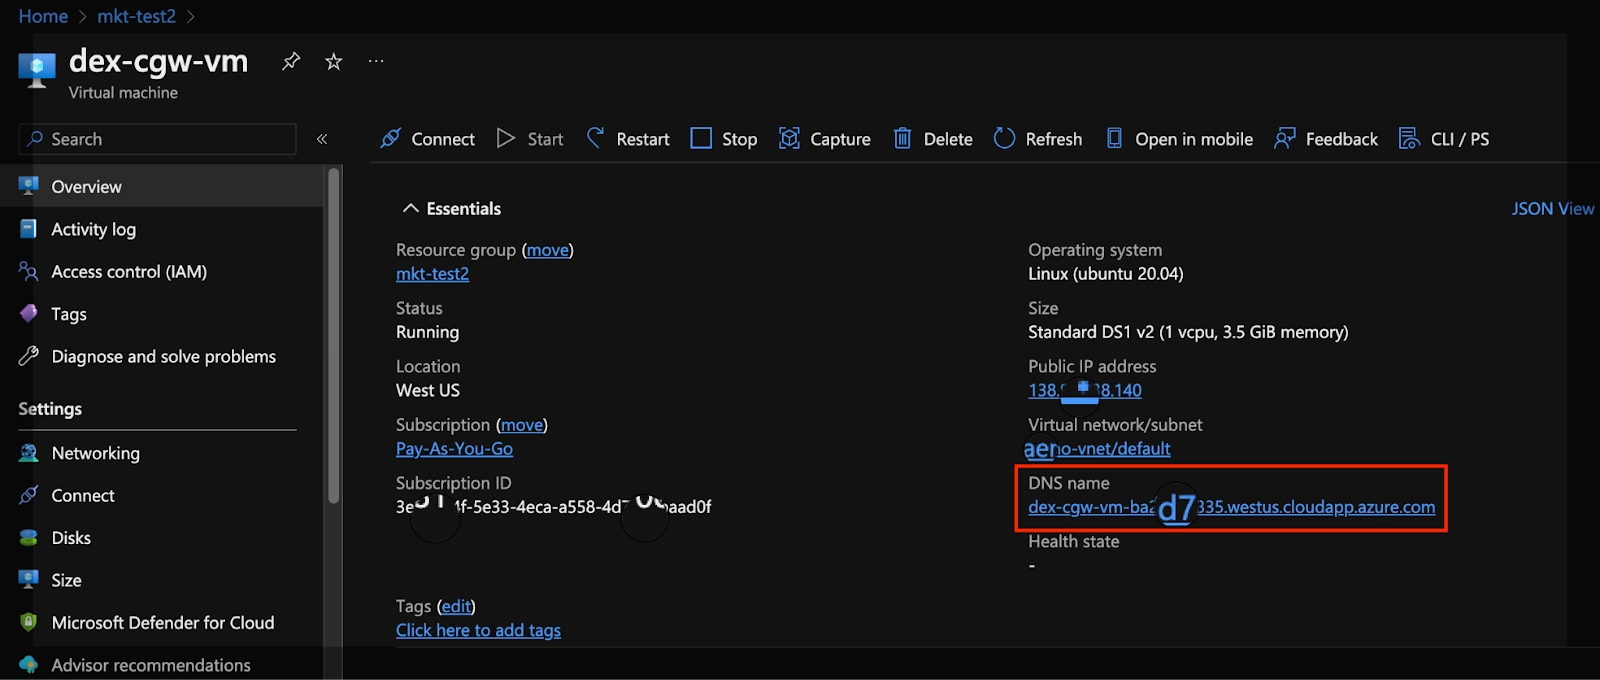
After a couple of minutes, the resource creation will complete. You'll find a Virtual Machine under the resource group.
On the VM’s overview page like below, the Digital Spine Integration Client can be accessed at the VM’s DNS in the browser.
2.2 Config DSI Client.
2.2.a Visit Client Application
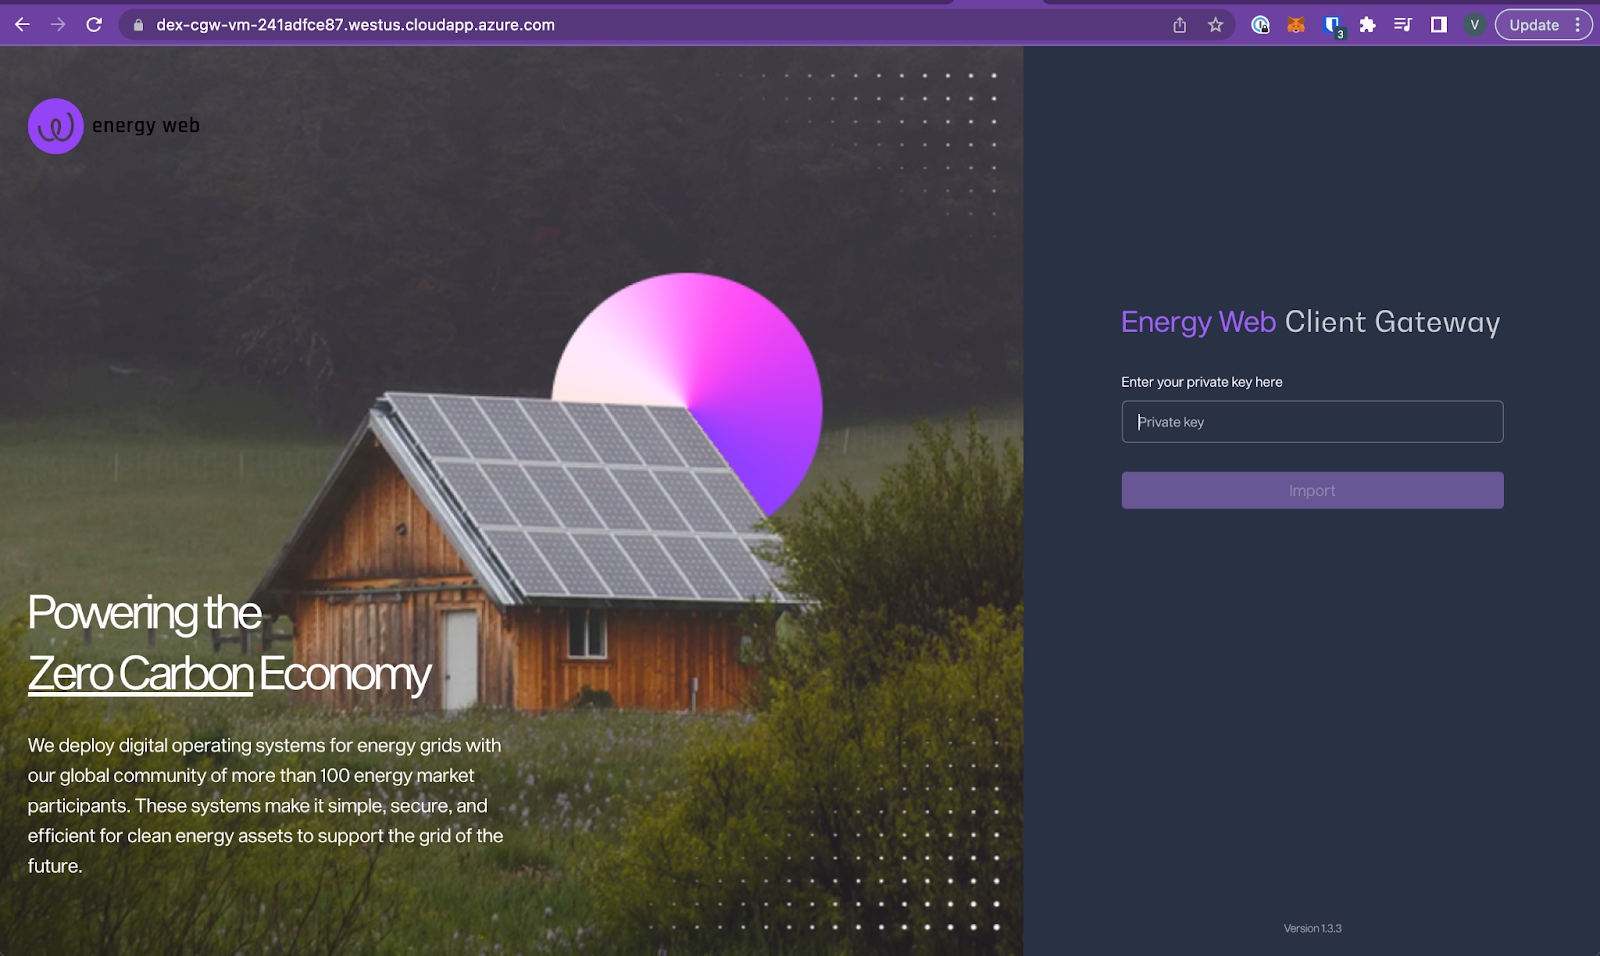
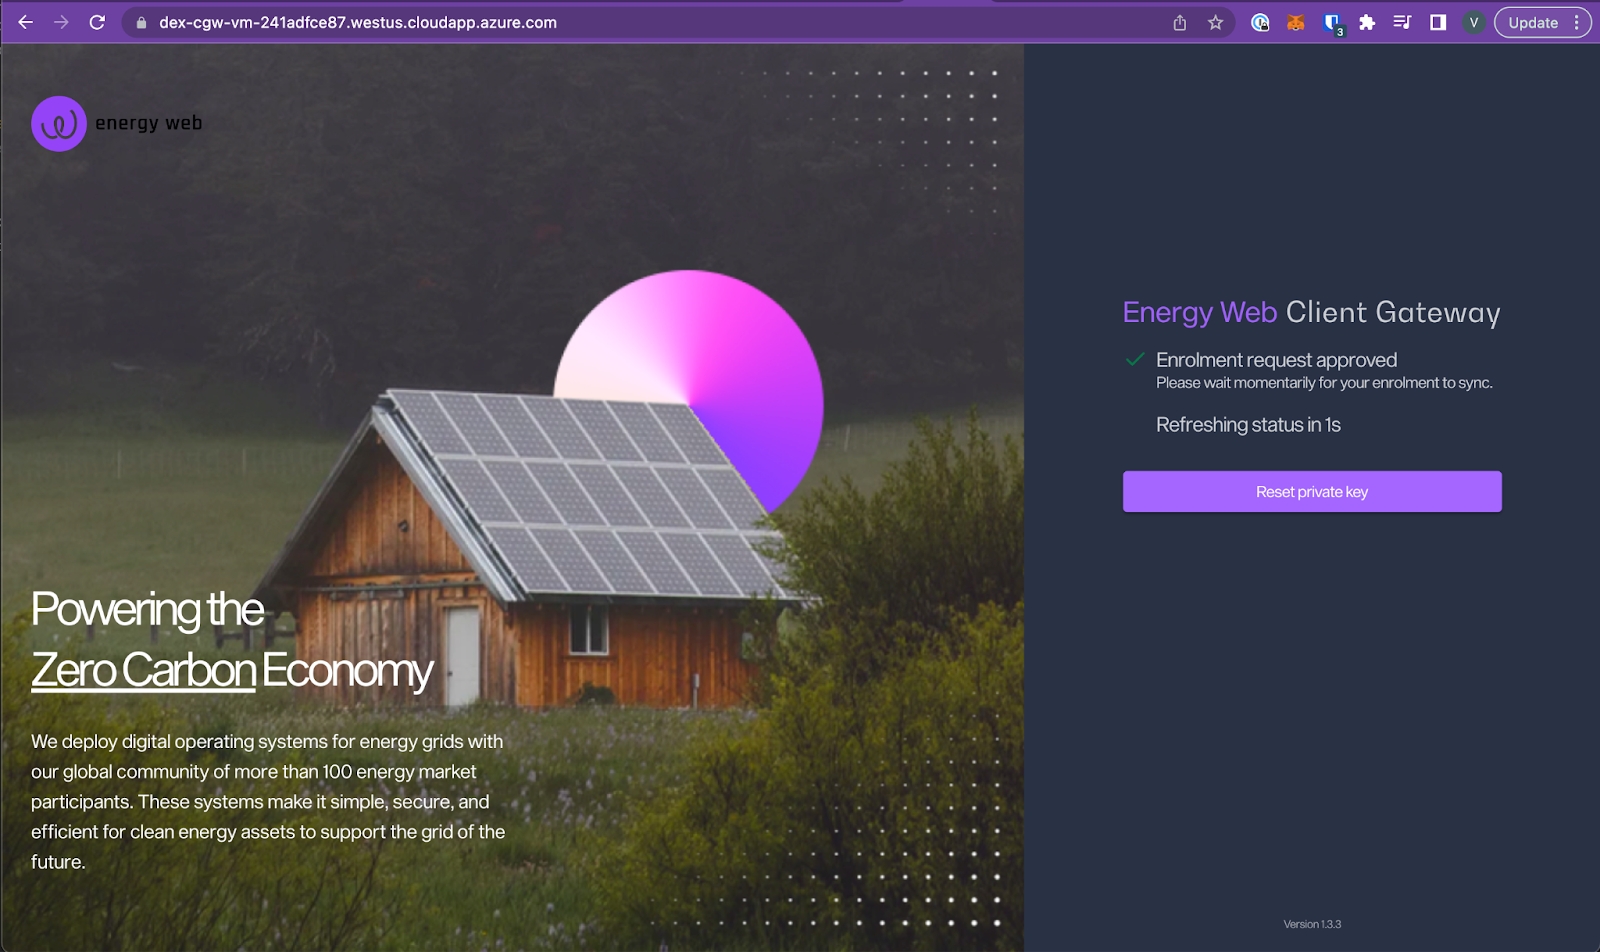
Open a browser and type in the DSI VM’s DNS; you will be directed to the DSI Client landing page as shown below:
2.3 Configure DID on the DSI Client
Reminder: Integration and identity access management (IAM) for the DSI Client is performed with Energy Web's self-sovereign identity technology stack (i.e DIDs and verifiable credentials). To manage your DID you will need a Digital Wallet and Metamask, with a minimum balance of 0.1 EWT, to execute IAM transactions in the Switchboard application including requesting roles and publishing credentials to your DID document. You can read more about Switchboard and IAM processes here.
NOTE: Sending and receiving messages via the DSI Client Gateway does not directly use or interact with the Energy Web Chain; you do NOT need EWT to send and receive messages. EWT is required only for the IAM and enrollment processes.
You will need to acquire the role of 'user' on your DID in order to enroll your DSI Client to the public message broker. Please complete this enrollment form for approval.
The DID will be the public address of the account you are using with your Digital Wallet and MetaMask.
The Energy Web team will review the enrollment request and grant approval within one business day of receipt.
On DSI Client landing page, enter the private key for your DID you will use for enrollment (note: the wallet address will be the DID) and hit ‘Import’.
To extract your private key for your Metamask account:
Click on the Account list dropdown, then click the kebab / three dot icon next to the account, then click 'Account Details'.
That will display a QR code with the Account address, and a button to "Show private key"; click that button and enter your password when prompted to reveal the private key.
Copy the private key and enter it into the form field in the DSI Client landing page.
Entering your private key at this step is a one-time configuration that is necessary to assign your DID to the DSI Client. When you enter the key in this step, it will be securely stored in the secret engine of your choice (i.e. Azure Key Vault or Hashicorp Vault). Energy Web will not have access to your key, and we will never ask you for it.
Be careful to never reveal, share, or paste your private key in any other steps within the DSI configuration and enrollment process.
It can take up to a minute for the DID to be verified and configured (assuming that your DID already has the role 'user'; if not, complete the enrollment form here).
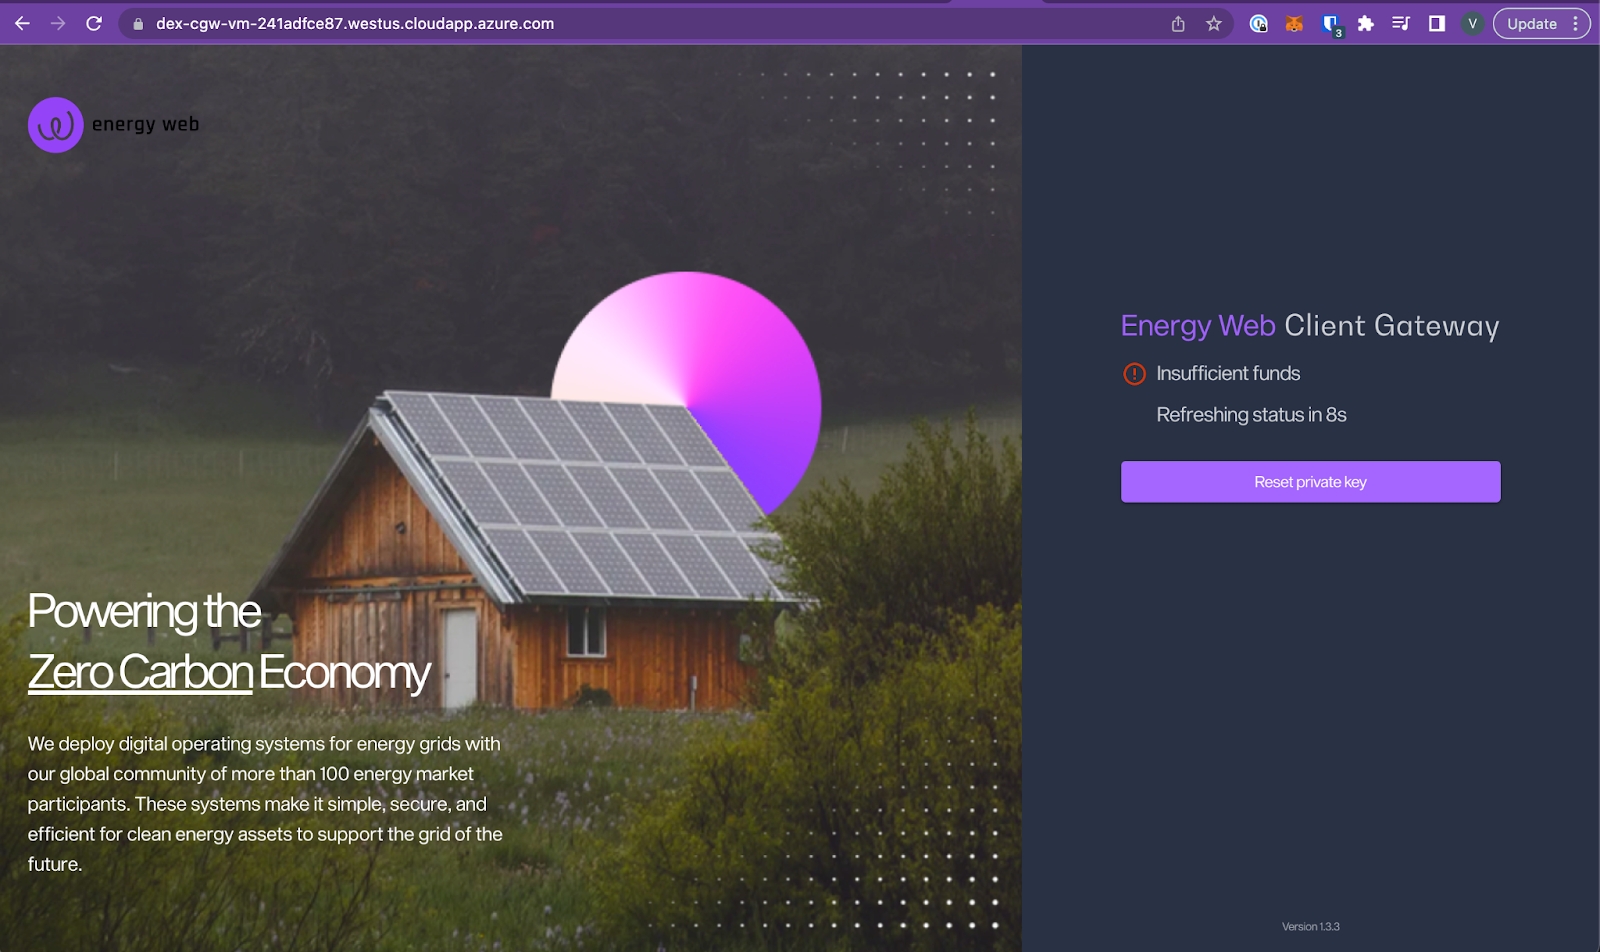
If your wallet does not have sufficient balance (a minimum of 0.1 EWT is recommended) you may receive an ‘insufficient fund’ error message. To learn about transactions and transactions costs, click here; to learn how to acquire EWT in your wallet, click here.
You'll need to have a sufficient balance of EWT in your wallet to pay for gas fees associated with DID enrollment transactions in order to proceed; a minimum balance of 0.1 EWT is recommended. REMINDER: You will only need to pay transaction costs for the IAM and enrollment processes.
Once you have a sufficient balance of EWT to cover the transaction cost, the application will proceed to the next stage of access validation.
2.4 Enroll the DSI Client with DID
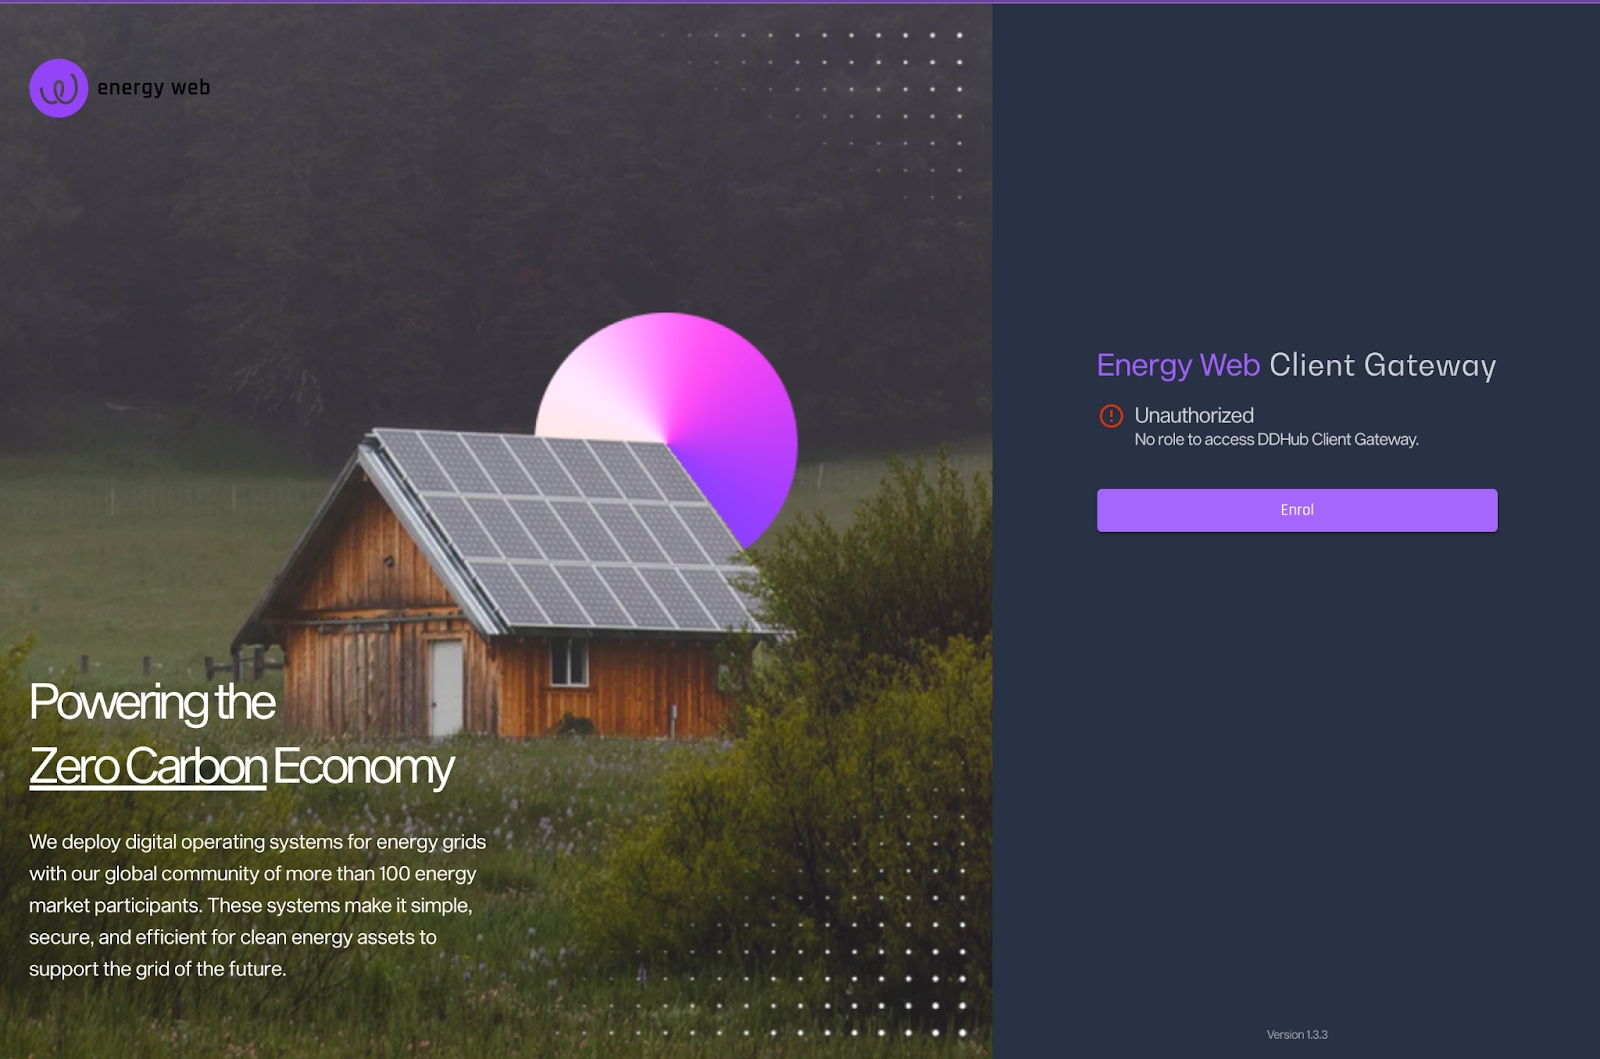
If your DID doesn't have the required 'user' role to the application you selected for the Integration Client at resource creation step. You'll see an ‘Unauthorized’ error.
To proceed, click ‘Enroll’ to submit the enrollment request.
Please complete this enrollment form for approval.
The Energy Web team will review the enrollment request and grant approval within one business day of receipt.
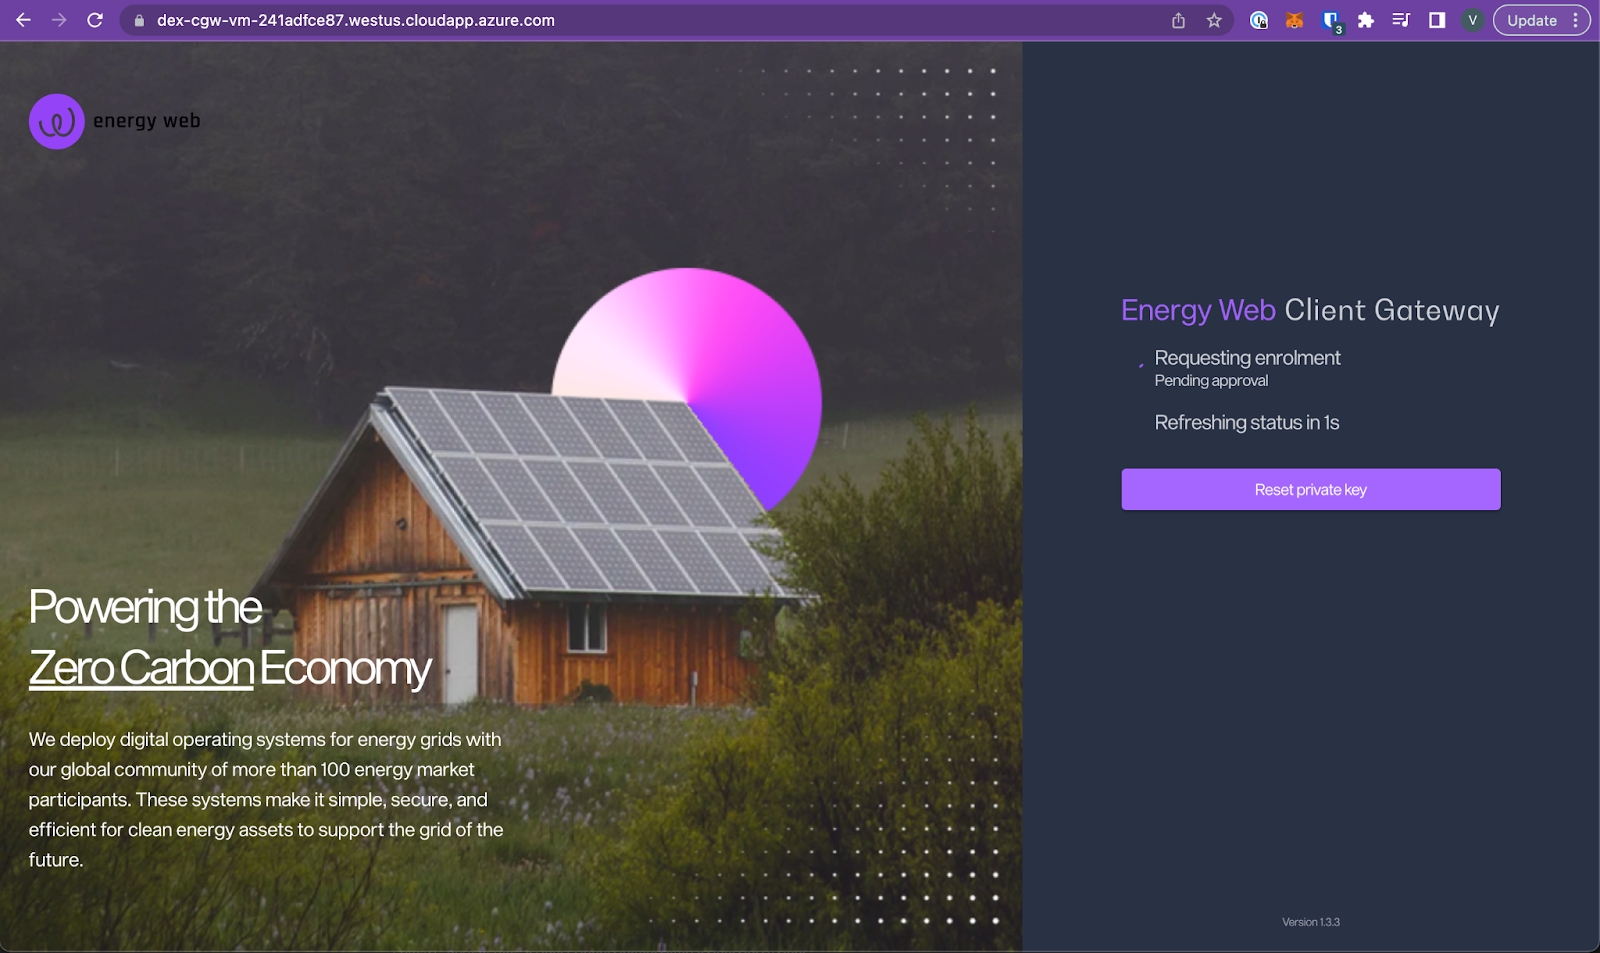
When the user role for your selected application is approved, you will see the status is changed to ‘waiting for role to sync’.
2.5 Manually sync role on Switchboard (dApp)
After submitting the enrollment request for your DID, the Energy Web team will contact you via email to notify you of approval. Upon receipt of the approval email, you can publish the newly issued role(s) to your DID document by following the instructions below.
In this guide, we use Metamask, it is the same process for other wallet option to logon dApp Switchboard. Make sure you have Metamask configured.
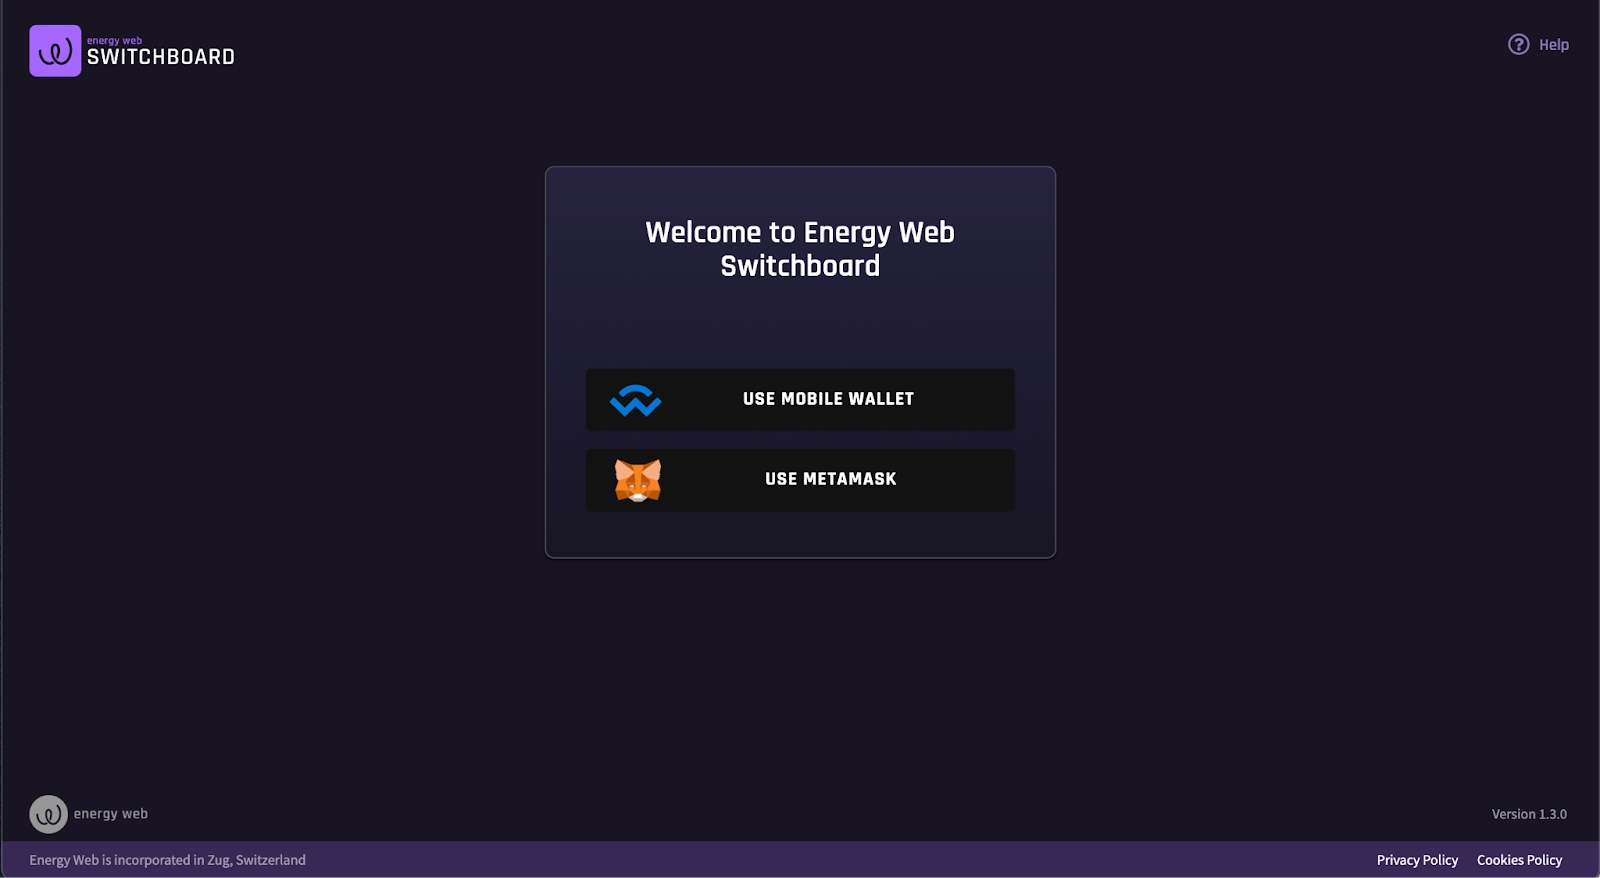
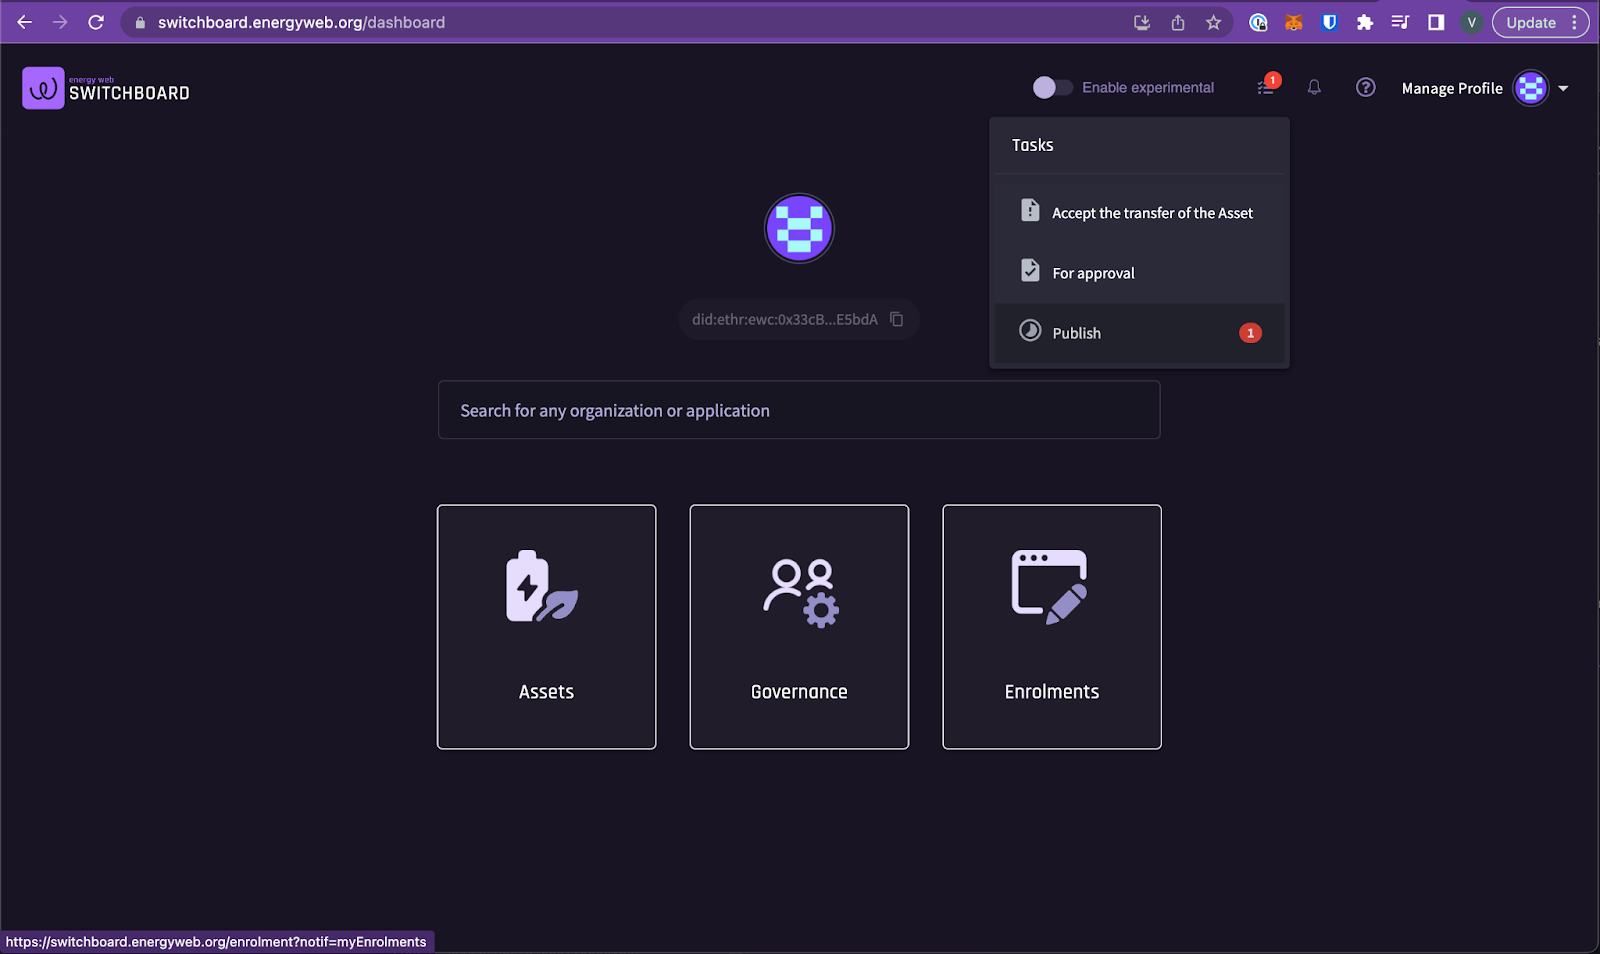
In a new browser tab, visit Switchboard (https://switchboard.energyweb.org/), click on the Use MetaMask button on the welcome screen of the Switchboard dApp to log in.
The MetaMask plug-in will pop up in the top right corner of the browser and request a signature to log in.
If you are logging in with a MetaMask account, you will be prompted to sign the message in the MetaMask Extension.
If you are logging in with a hardware wallet account (via MetaMask), you will also be prompted to connect to your hardware wallet and sign the message on that device.
After providing the signature, you will be logged in into Switchboard dApp.
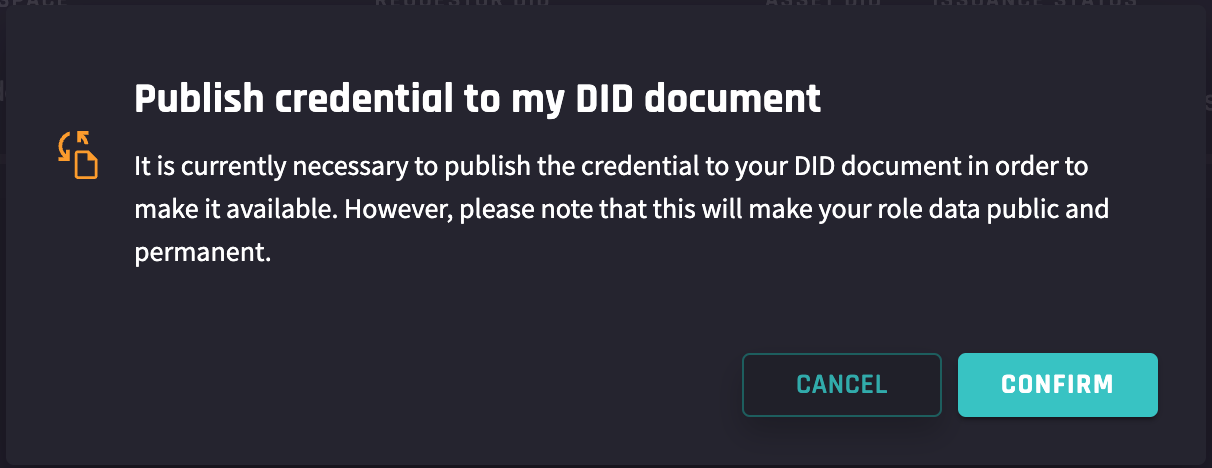
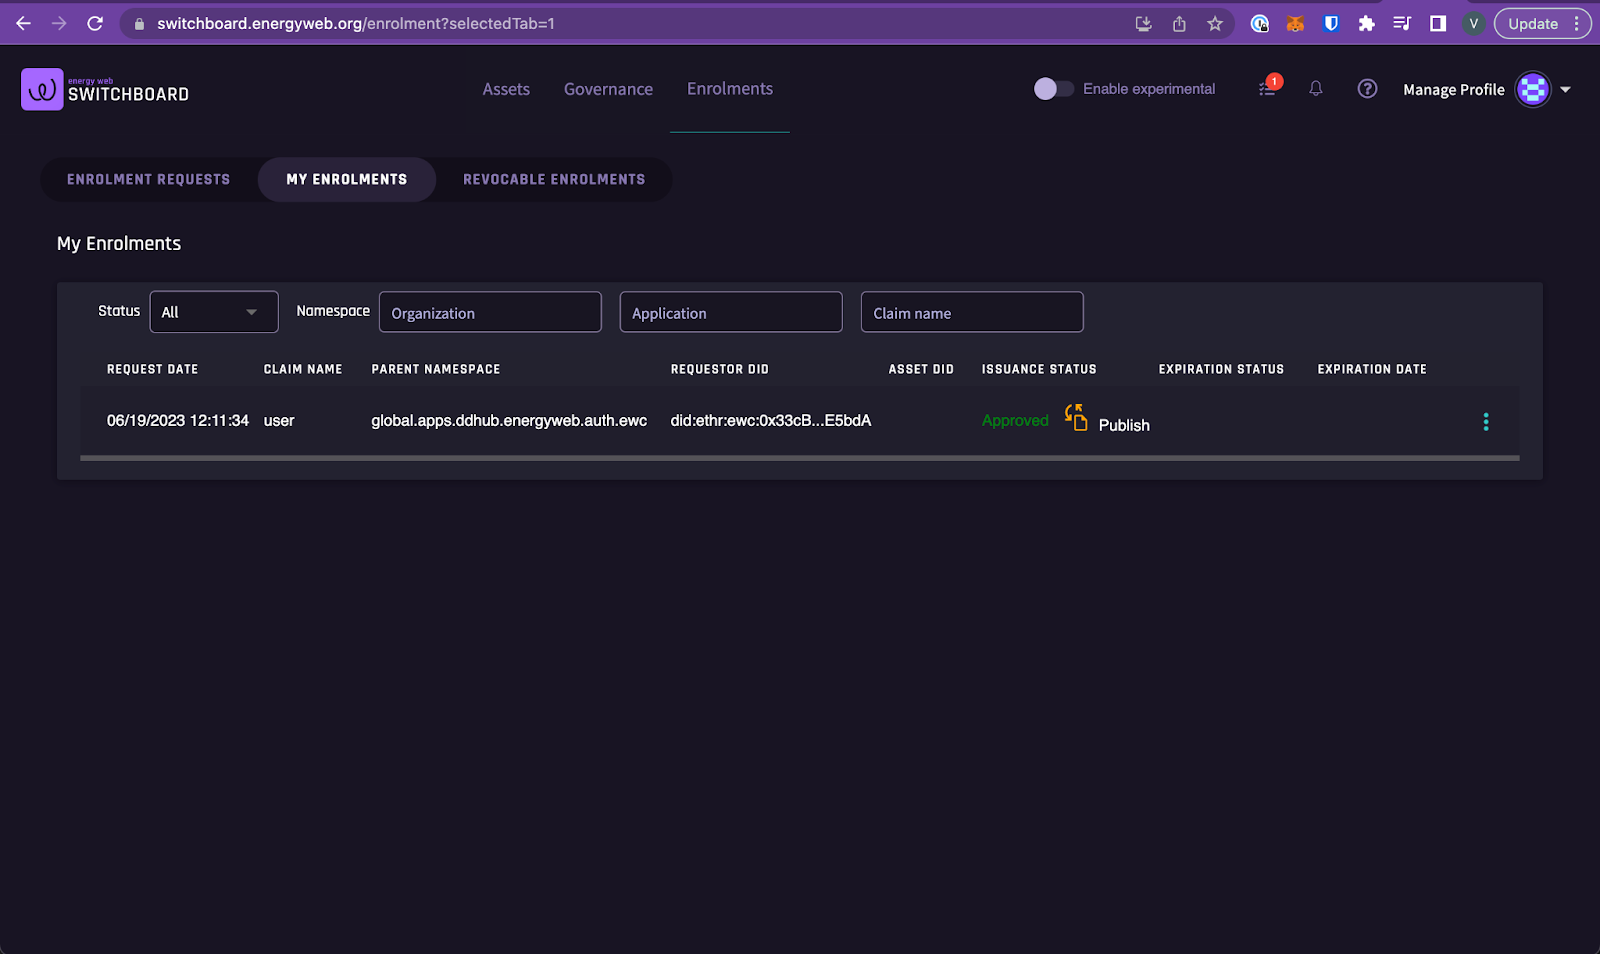
The top right menu icon has a notification. Click to open, you will find one publication available.
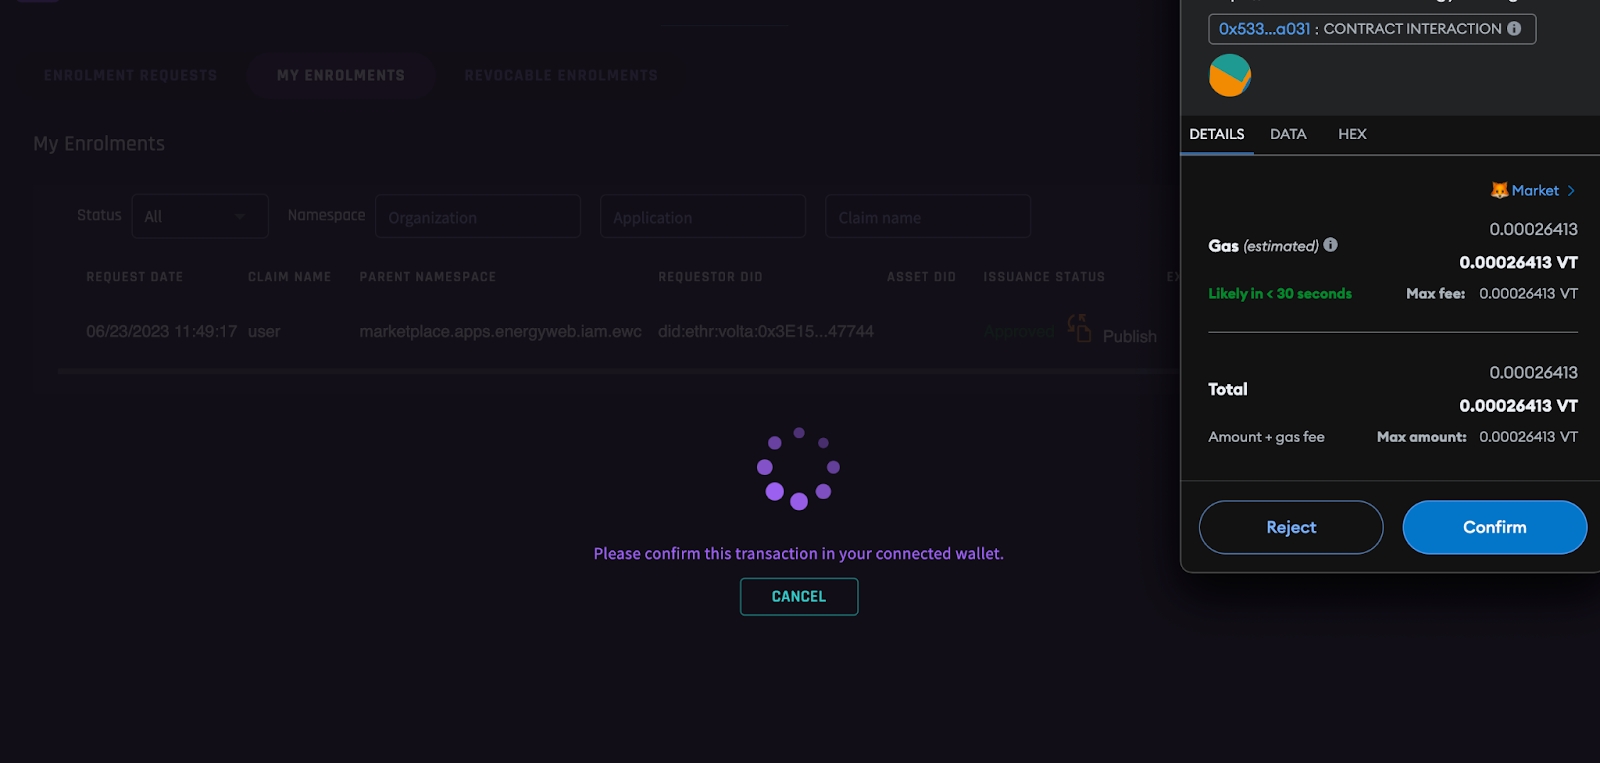
Click ‘publish’, on the confirmation modal click ‘CONFIRM’.
The MetaMask plug-in will pop up in the top right corner of the browser and request a signature for the transaction.
Follow along to sign the transaction in Metamask, then you'll see the ‘publish is successful ‘ notification.
When the publish is completed, you can return to the the DSI Client browser tab.
3. Client UI walk through.
This guide is based on the application name ‘marketplace.apps.energyweb.iam.ewc’, It is the same concept and flow for your chosen application
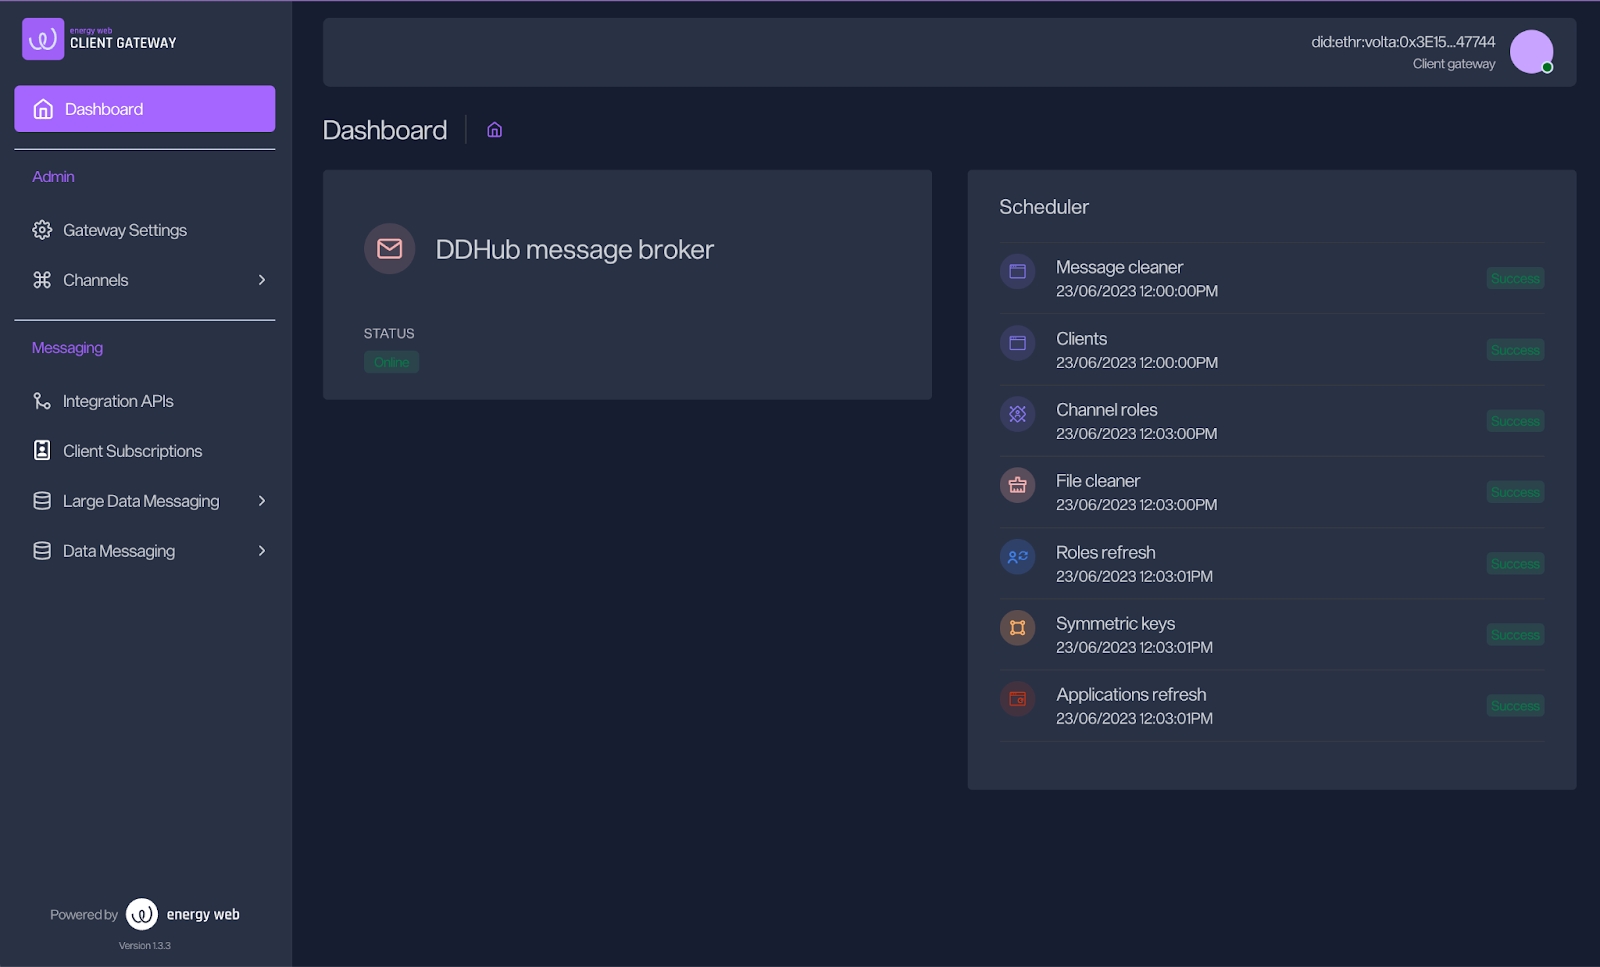
At the time of revisiting the DSI Client, it should successfully redirect you to the dashboard page. If not, check to make sure your Metamask extension is connected to the correct (enrolled) account. If the correct account is active, you may need to refresh the DSI Client landing page and re-enter your private key as described in the previous section.
You may see fewer items under the ‘Scheduler’ section at the first time you log in. Just wait a few moments and refresh the page, there should be more scheduled tasks shown, the time under the task names is when the task was recently completed
When you can see ‘Application refresh’ and ‘Topic Refresh’ with ‘Success’ status, you can navigate to ‘Topic management’ OR ‘Channels’ > ‘My apps and topics’ from the left navigation menu.
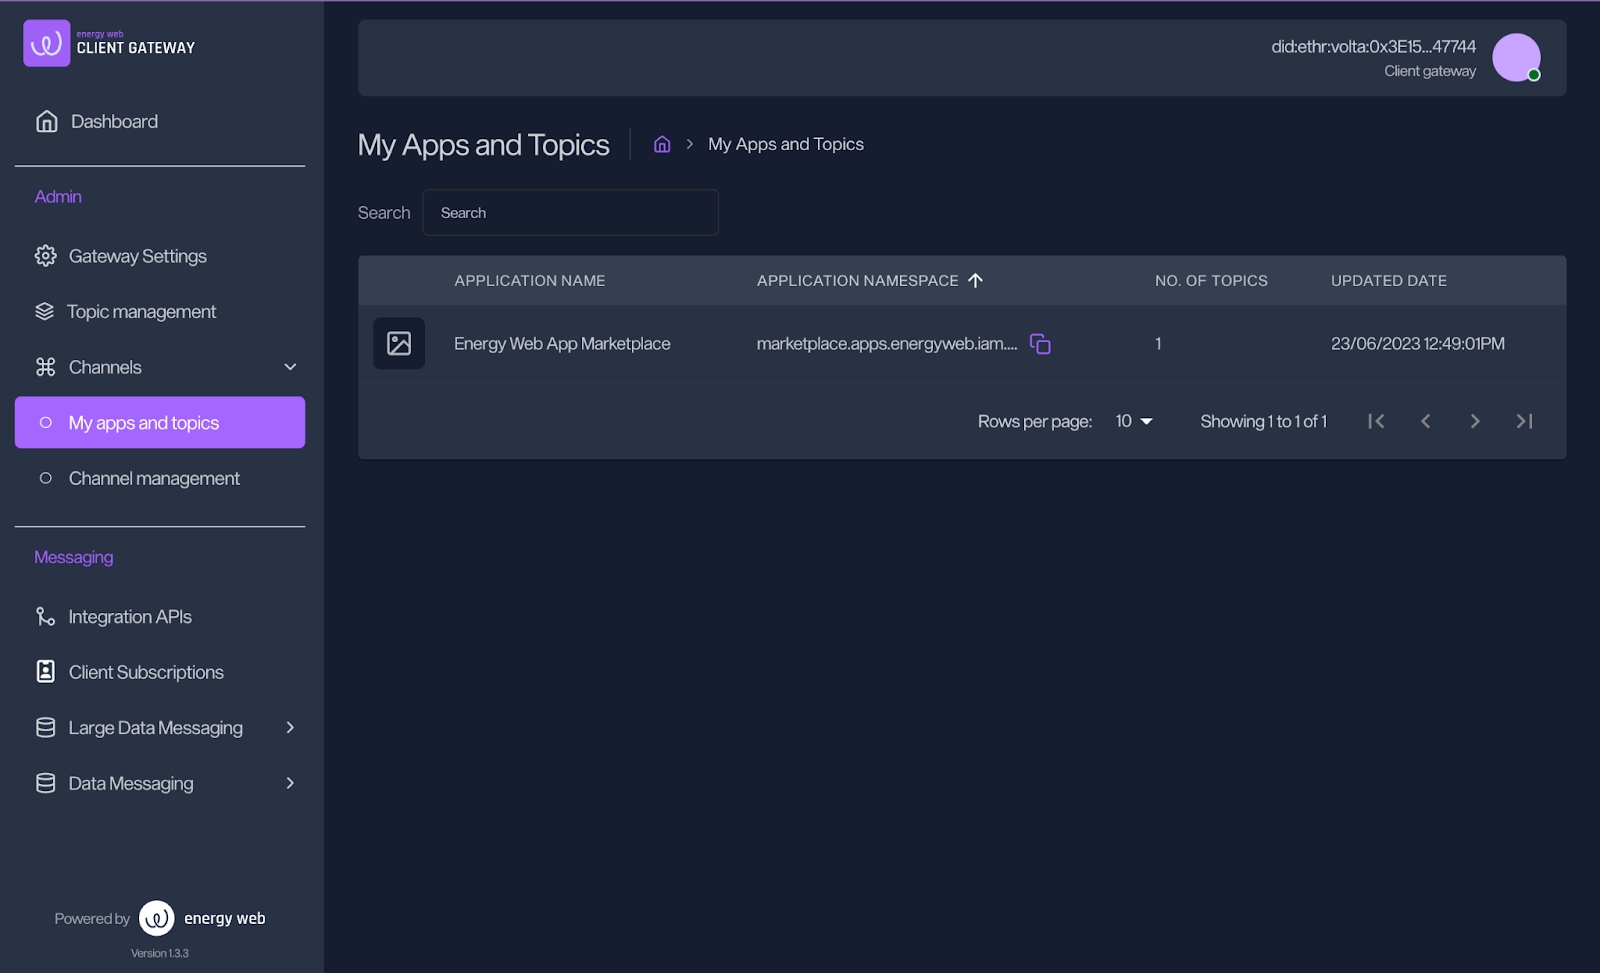
Your application will be shown on the list. There is one sample topic created for the application (*one is available at the time of writing, but additional topics will be added over time. You may see more topics available for your application).
If you click on the application, it will show you all the topics
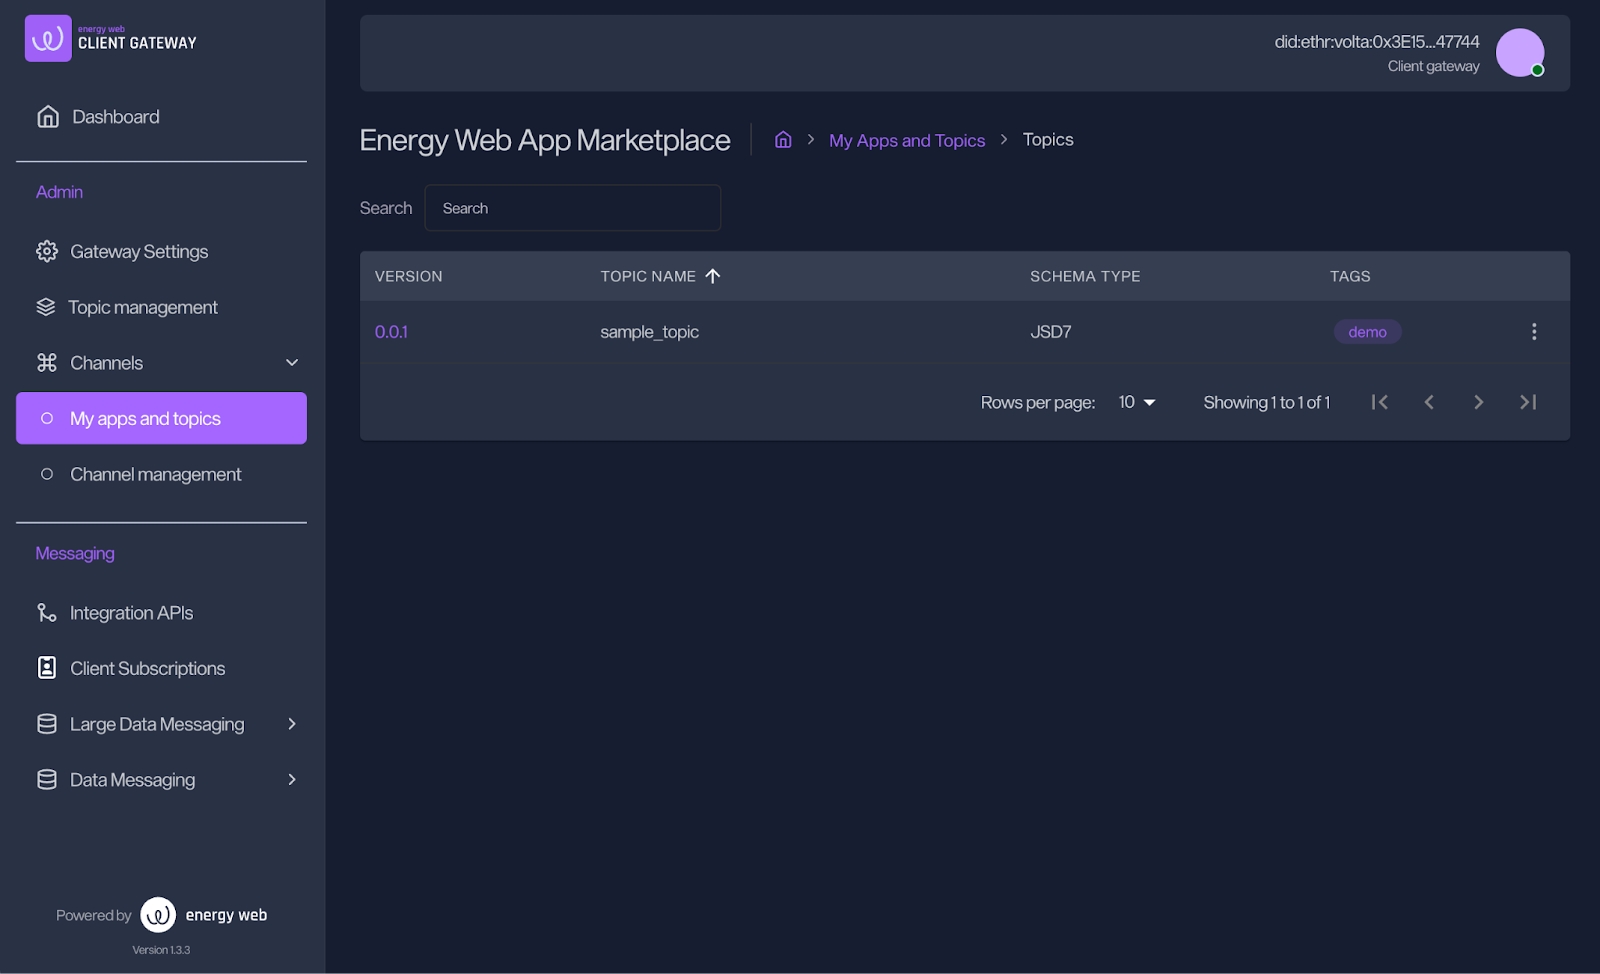
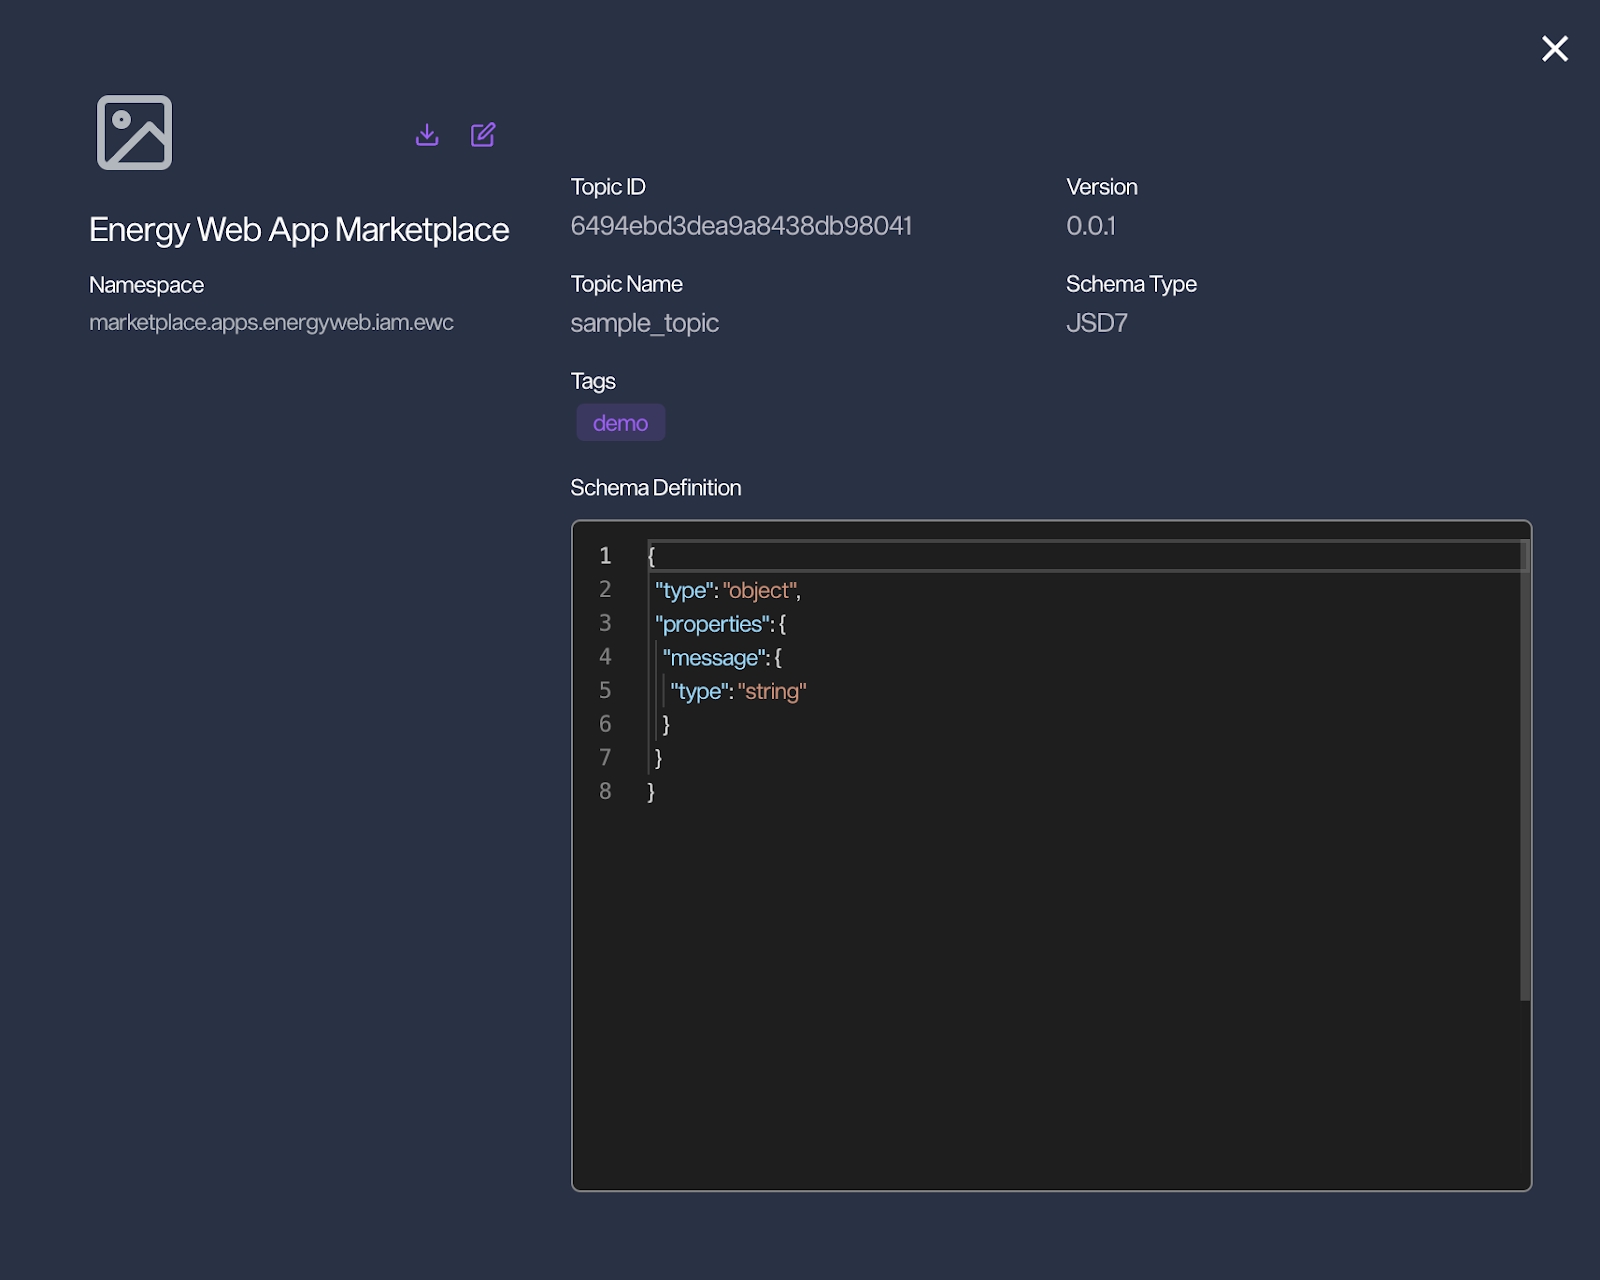
You can also view the topic by clicking on it
Topic is a definition of the data schema. Which will be strictly validated during data exchanging.
You can learn more about topics here
Next we'll explain how to use the topic.
The DSI Client lets you easily create more sophisticated topics based on different business requirements.
You will need the ‘topiccreator’ role to manage(create/update/delete) topic/schema within an application scope.
Please contact digital-spine.support@energweb.org for ‘topiccreator’ role enrolment or other assistances.
4. Creating Channels.
You can have a better understanding about Digital Spine channels here. Few summarised Key points to bear in mind.
"Publish" type channel is for sending data and "Subscribe" type channel is used for retrieving data
Channels can be configured to enable one:one, one:many, and/or many:many communications by changing settings for who can receive or send data in the channel scope
Topics are used by channels, and it defines what kind of data can be send/retrieved to/from a channel, A channel can have multiple different topics
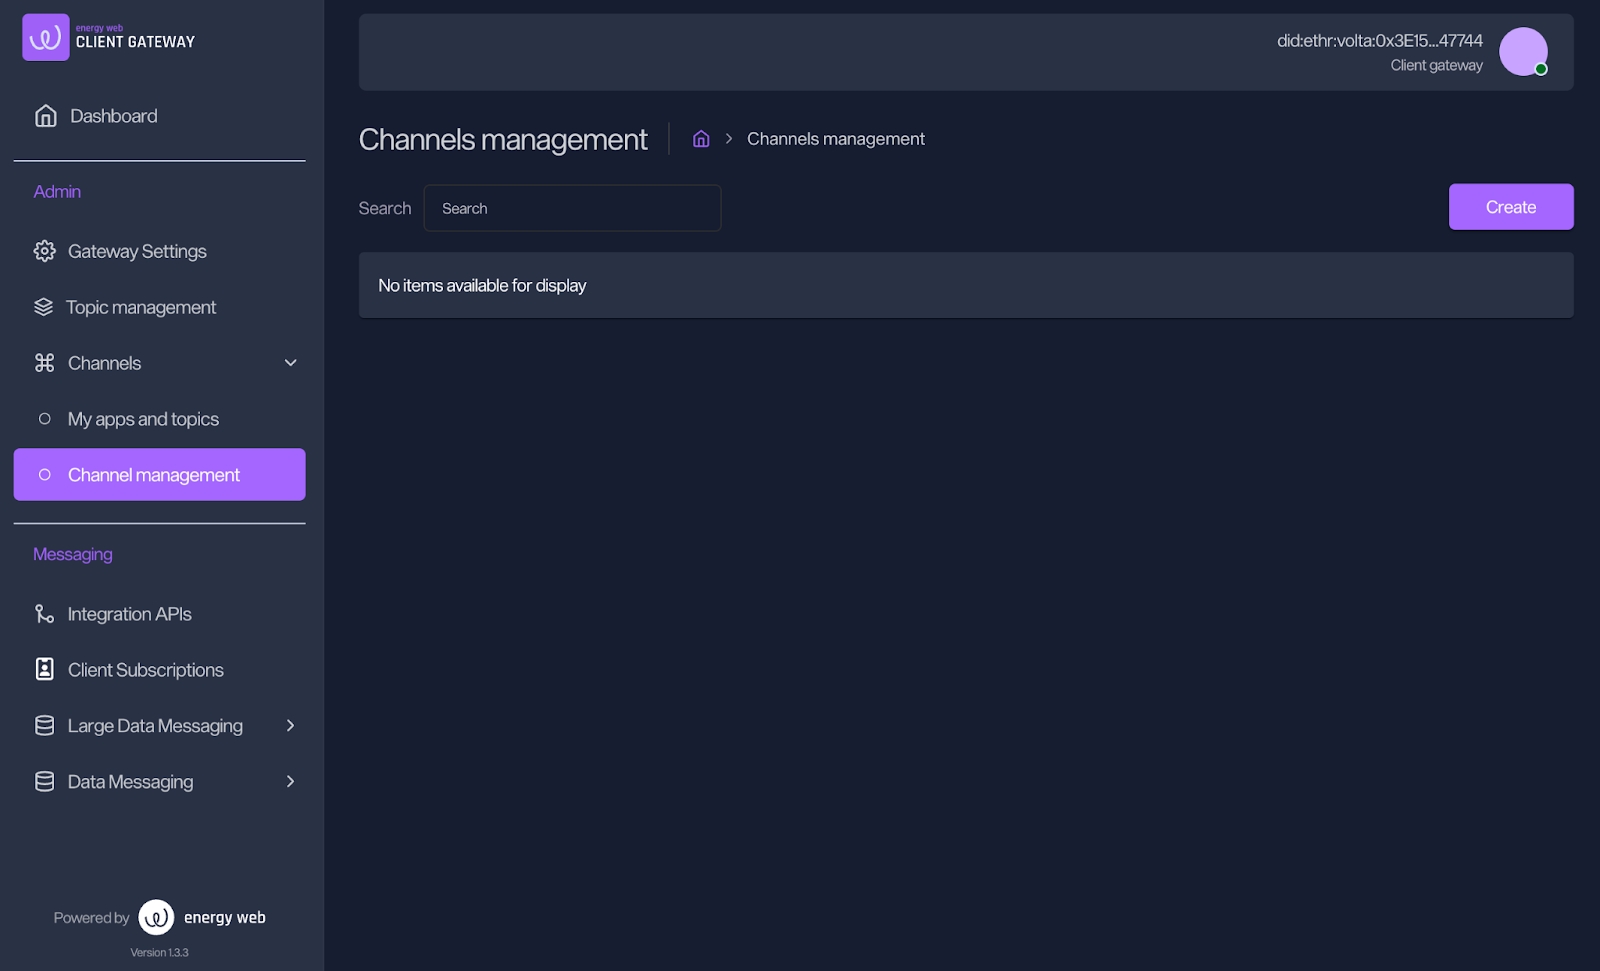
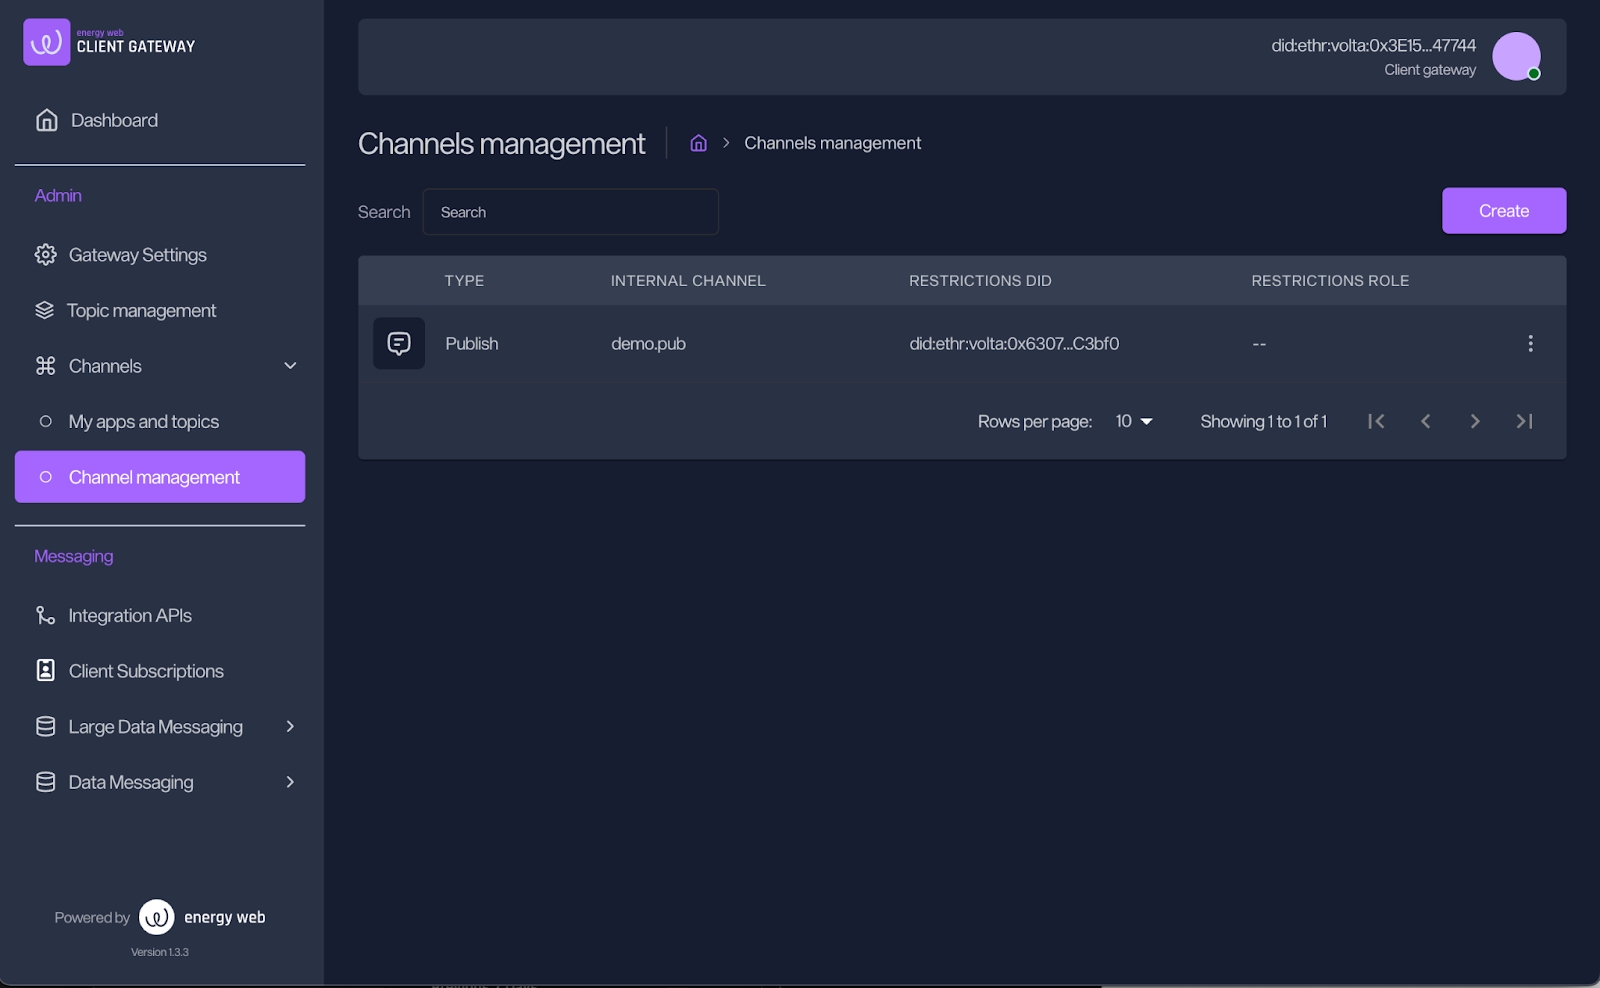
On the UI, from the left navigation menu, under ‘Channels’, navigate to the ‘Channel management’. Here is the section you manage all your channels
4.1 Creating a Publish Channel
To create a channel, simply click ‘Create’ on the page.
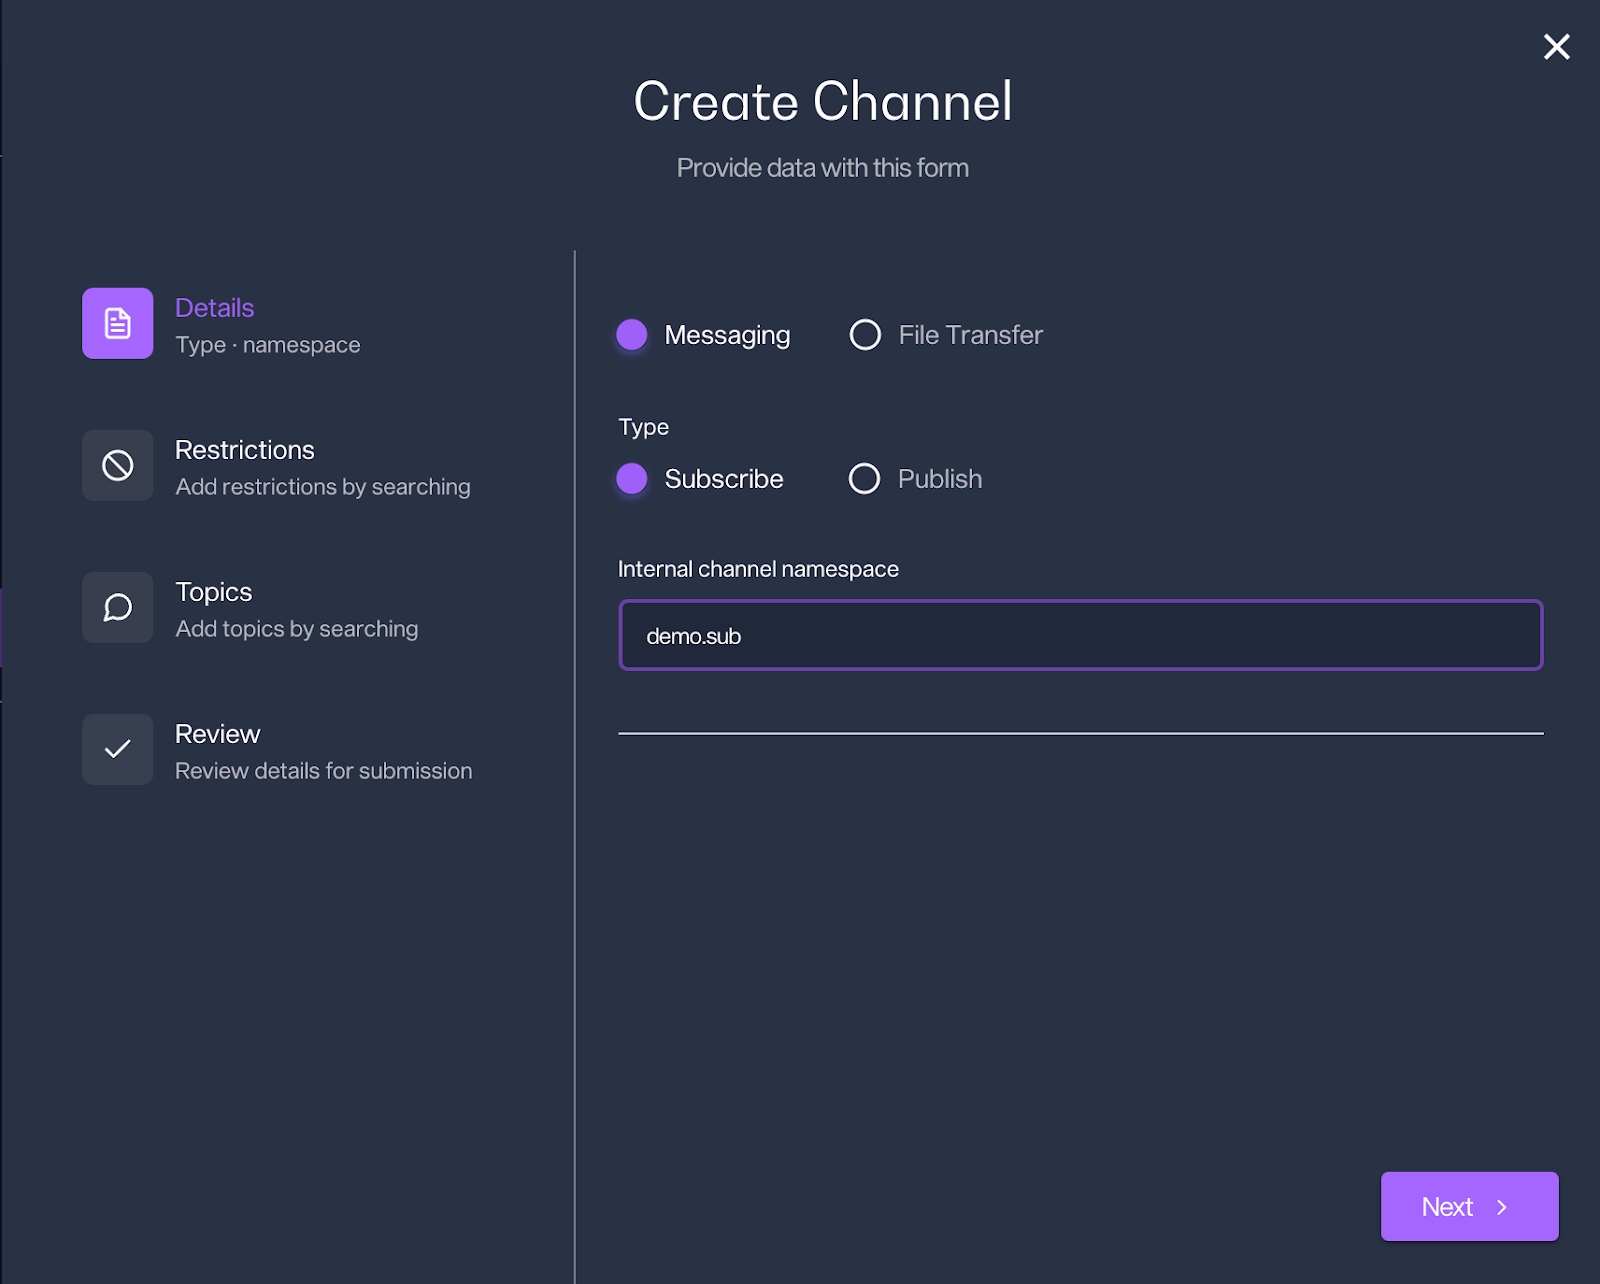
In the pop-up modal, you can define the channel details.
The example below shows creating a ‘Messaging’ Publish channel named ‘demo.pub’; when you have defined your channel details click ‘Next’,
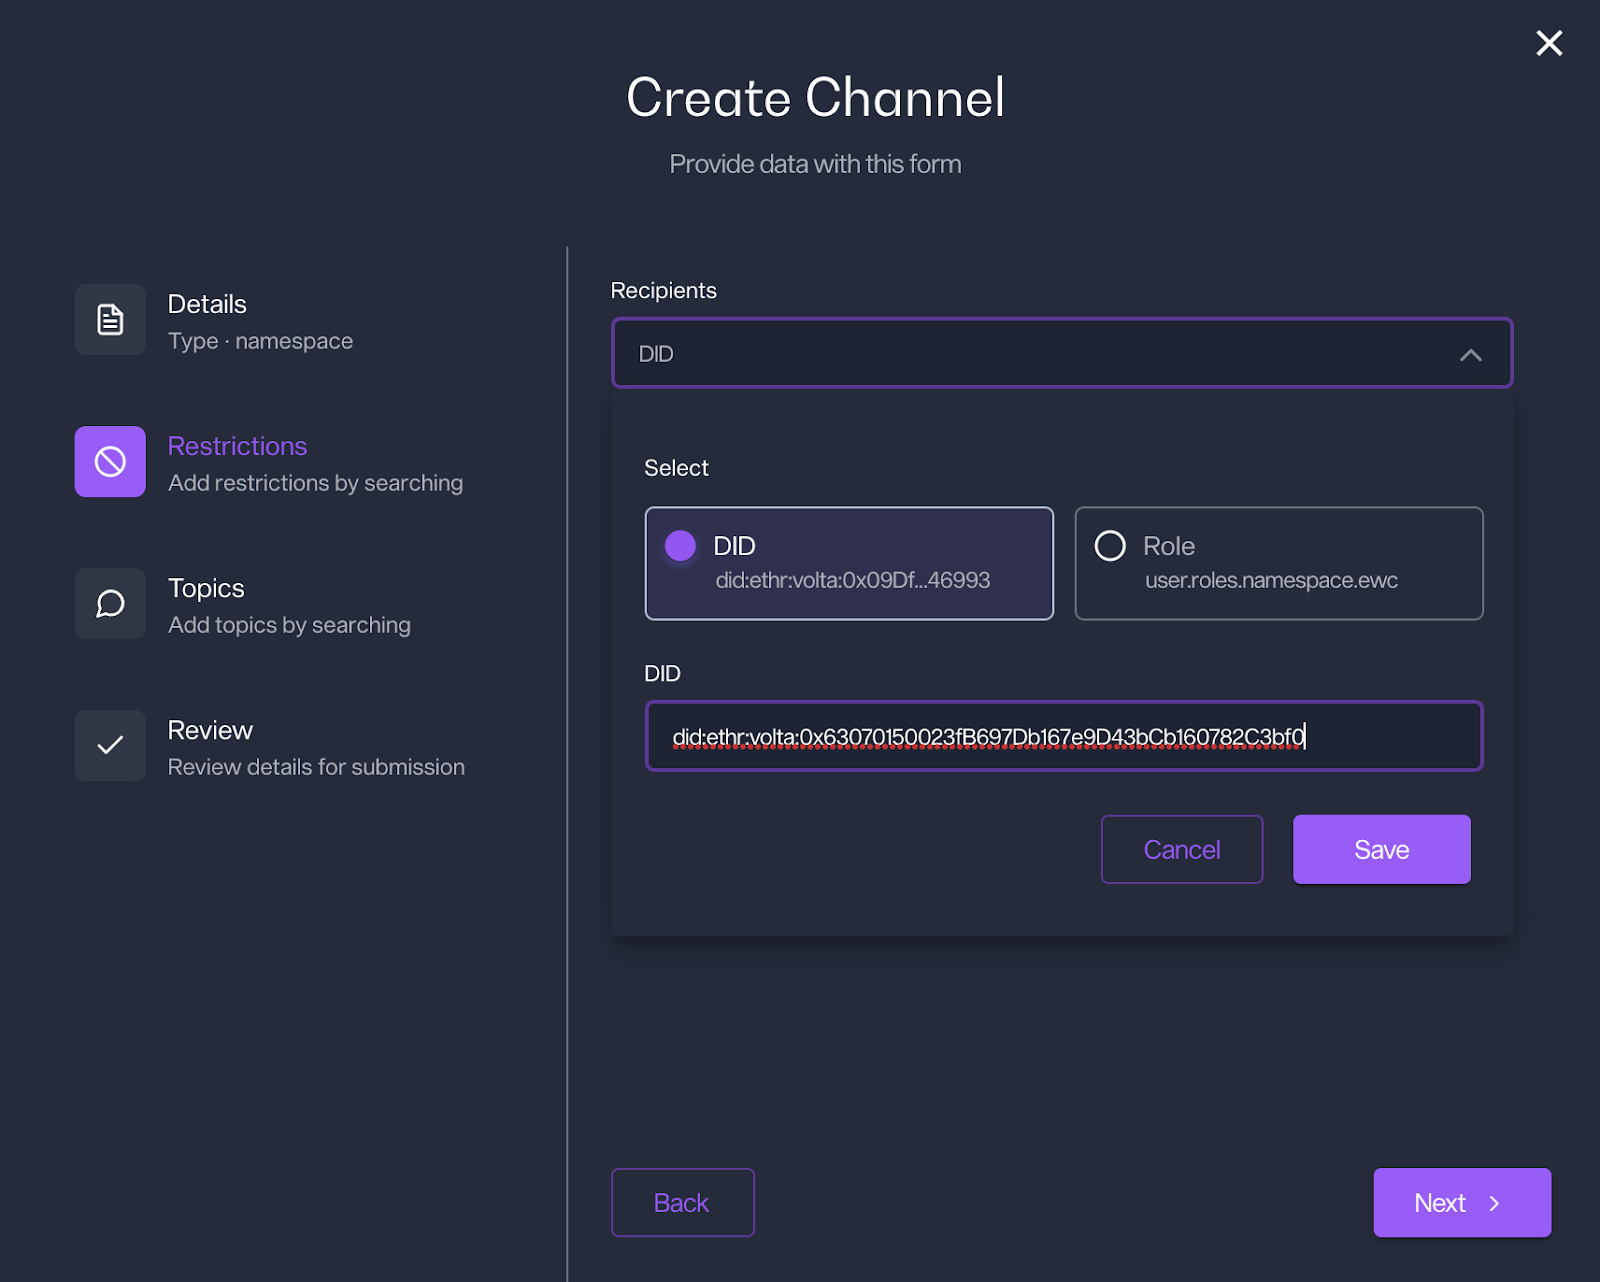
At the ‘Restrictions’ tab, you are able to restrict the recipients by `DID` or ‘Role’, this will make sure only defined recipients will receive messages from this channel.
In Energy Web ecosystem, DIDS and Roles have below format
EW main chain DID format: `did:ethr:ewc:WALLET_ADDRESS`
EW volta chain DID format: `did:ethr:volta:WALLET_ADDRESS`
EW role format: `ROLE_NAME.roles.APP_NAME`
Make sure you click the ‘Save’ button after you put in the recipient DID or Role. To add multiple recipients, repeat this step as necessary.
To proceed to the next step, click “Next”.
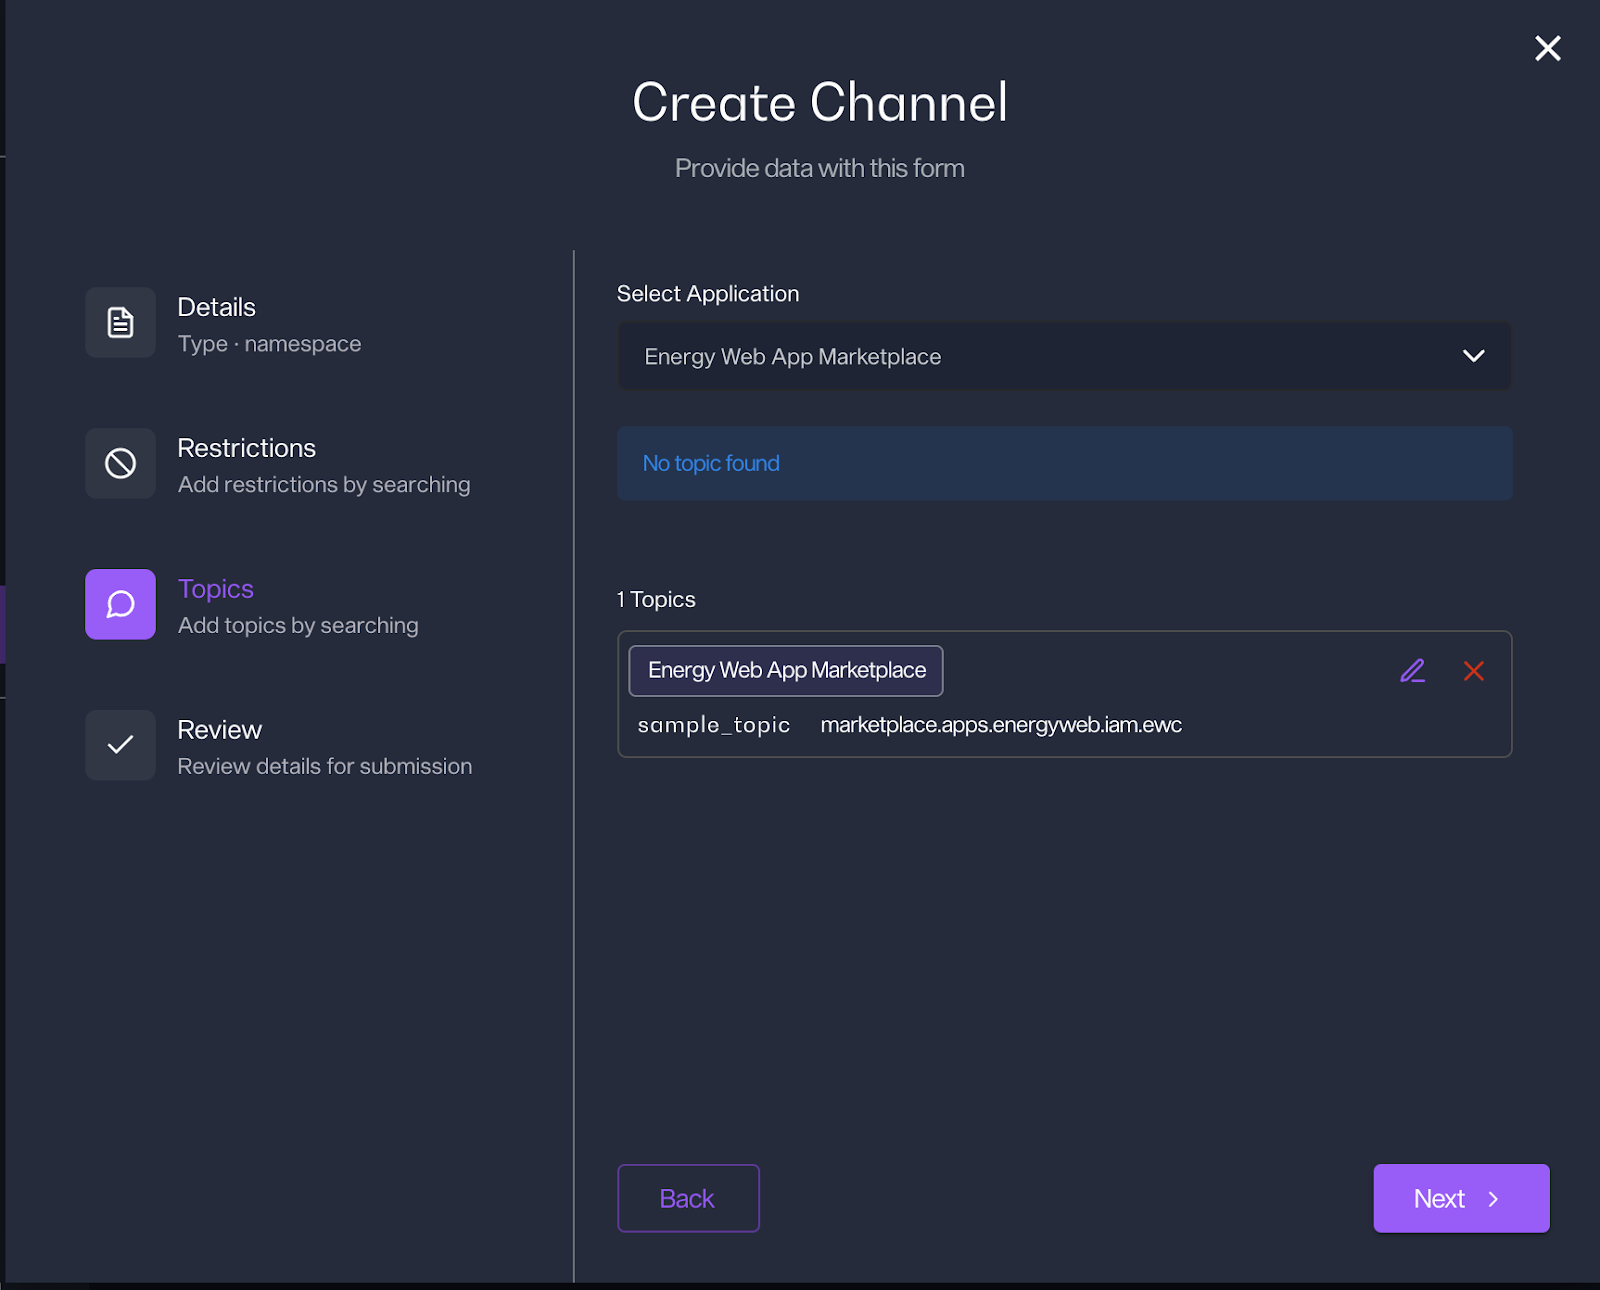
On the next screen, you will define what topics to add to this channel.
You can select your desired application from the ‘Select Application’ dropdown, then the available topics belonging to the application will be shown in the ‘topics’ dropdown, click on the topic to add, you can select multiple topics to this channel.
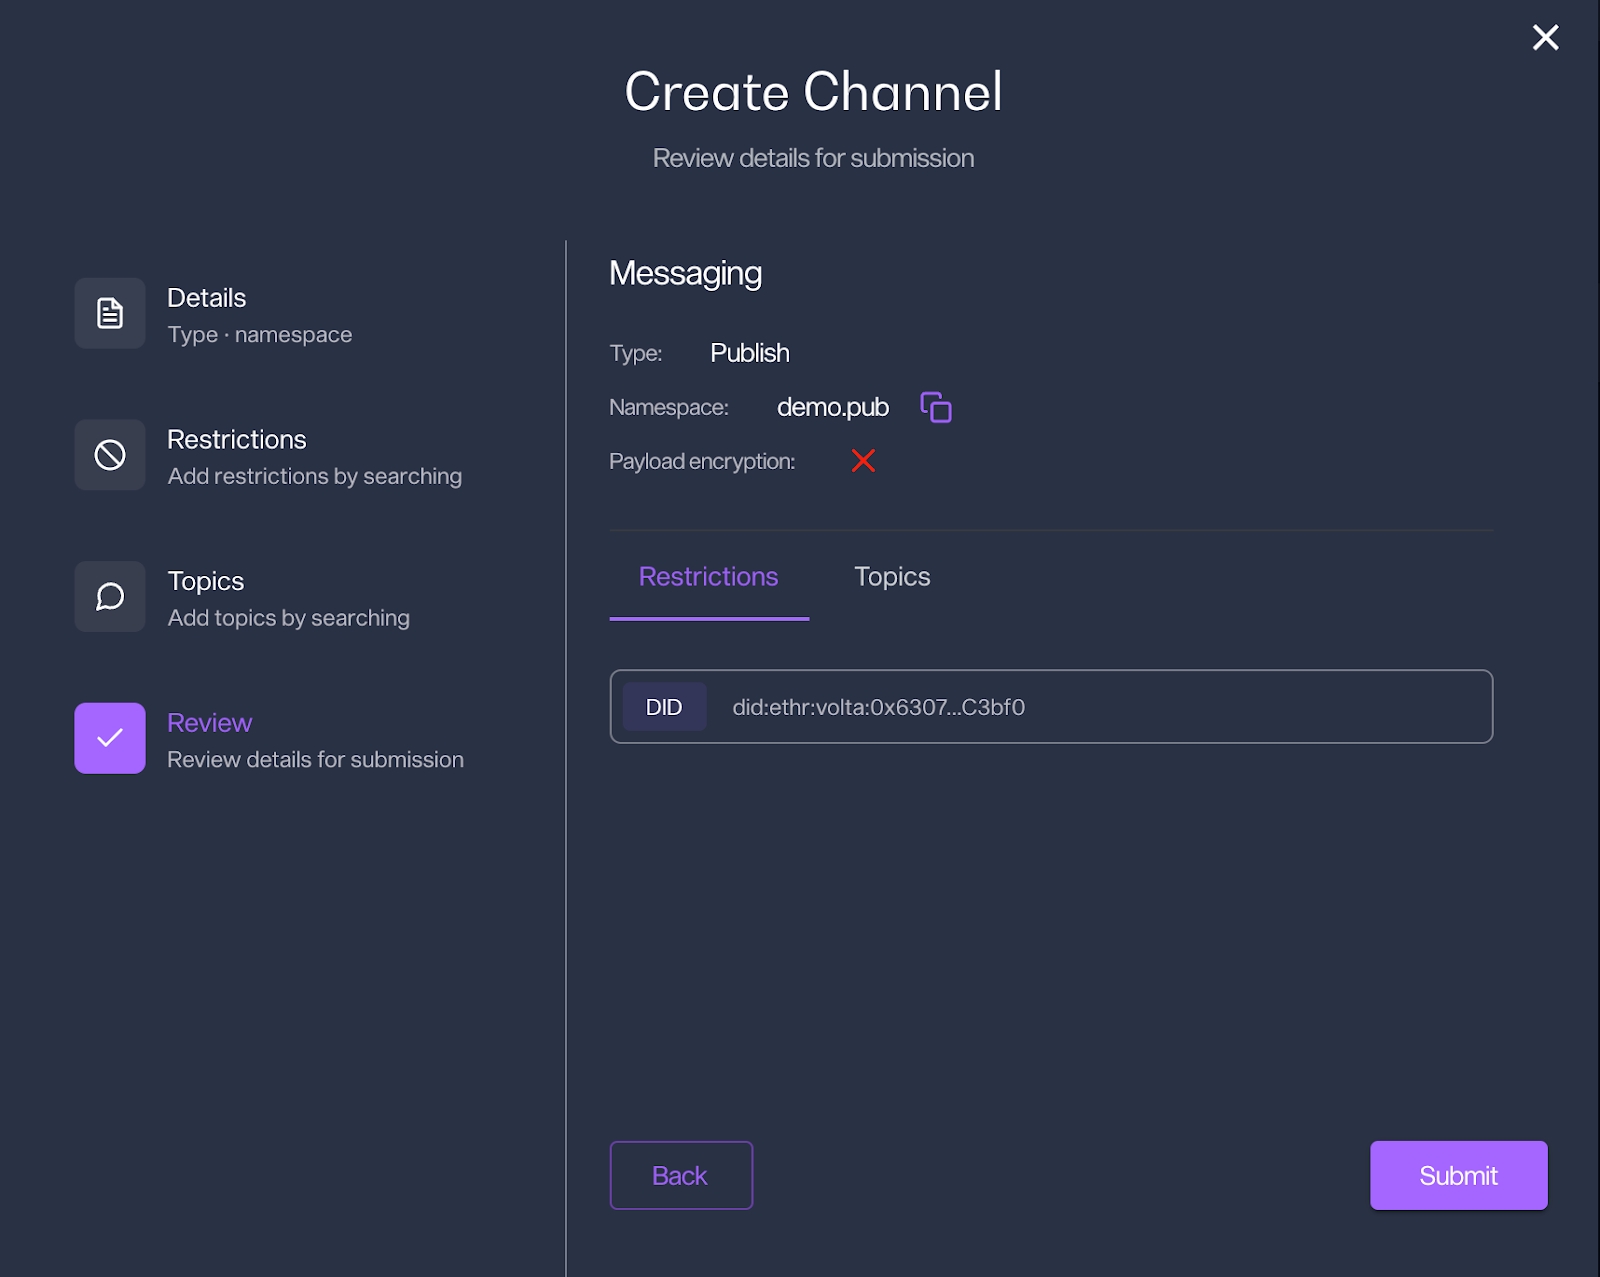
At the last step you can review all the channel details; if you need to revise any settings, click back. When you have confirmed all settings, click "submit" to create the channel.
After clicking ‘submit’, The channel will be shown on the channel list.
A ‘Publish’ channel is used to send data to other recipients. You will need a separate ‘Subscribe’ channel to receive data from others. You can create as many channels as necessary by following the above steps.
4.2 Creating a Subscribe Channel
Creating a ‘Subscribe’ channel is exactly the same process as 'Publish' channel, but selecting the channel type ‘Subscribe’
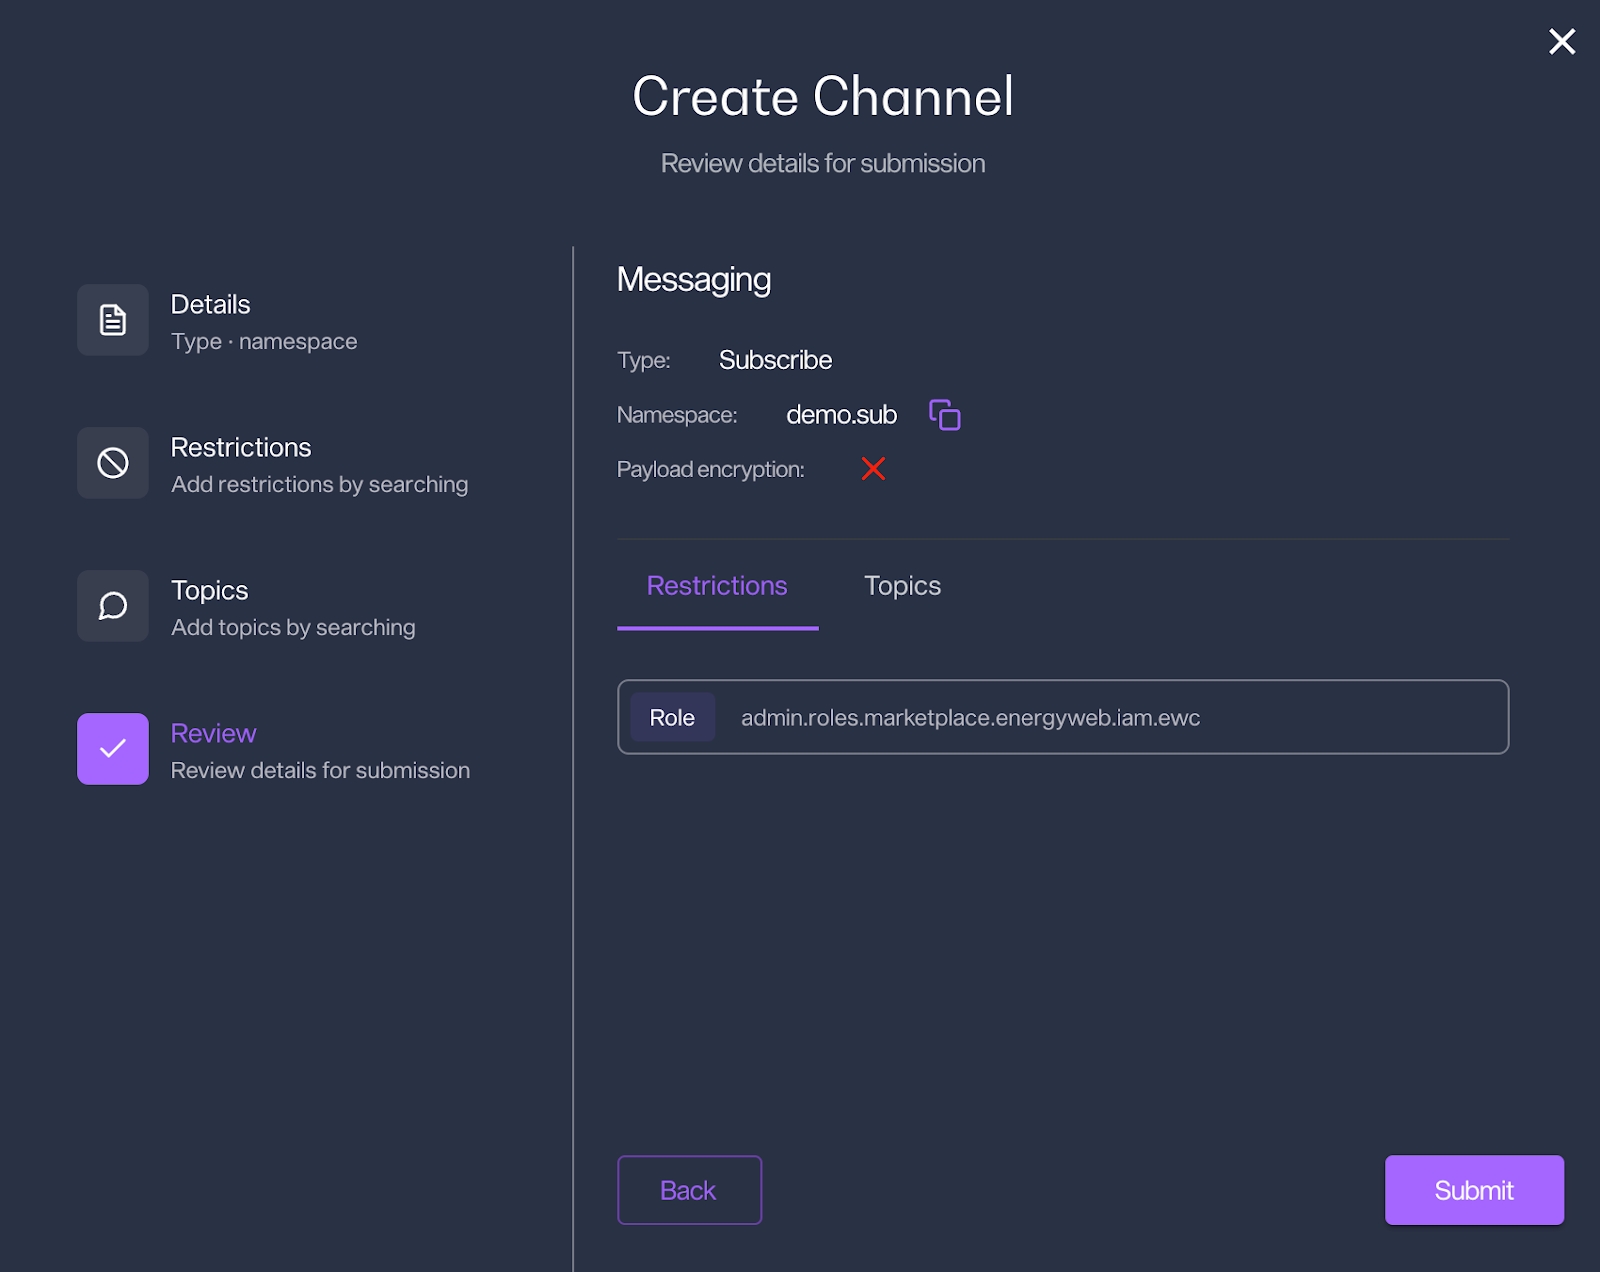
And at the ‘Restrictions’ section, we can restrict whom we only want to receive data from.
For demonstration purposes, we restrict to only receive data from senders who has role ‘‘admin.roles.marketplace.energyweb.iam.ewc’
On the Topics tab, same concept as above publish channel, here we restrict what kind of data we want to retrieve from this channel.
And review all the details and submit our ‘Subscribe’ channel.
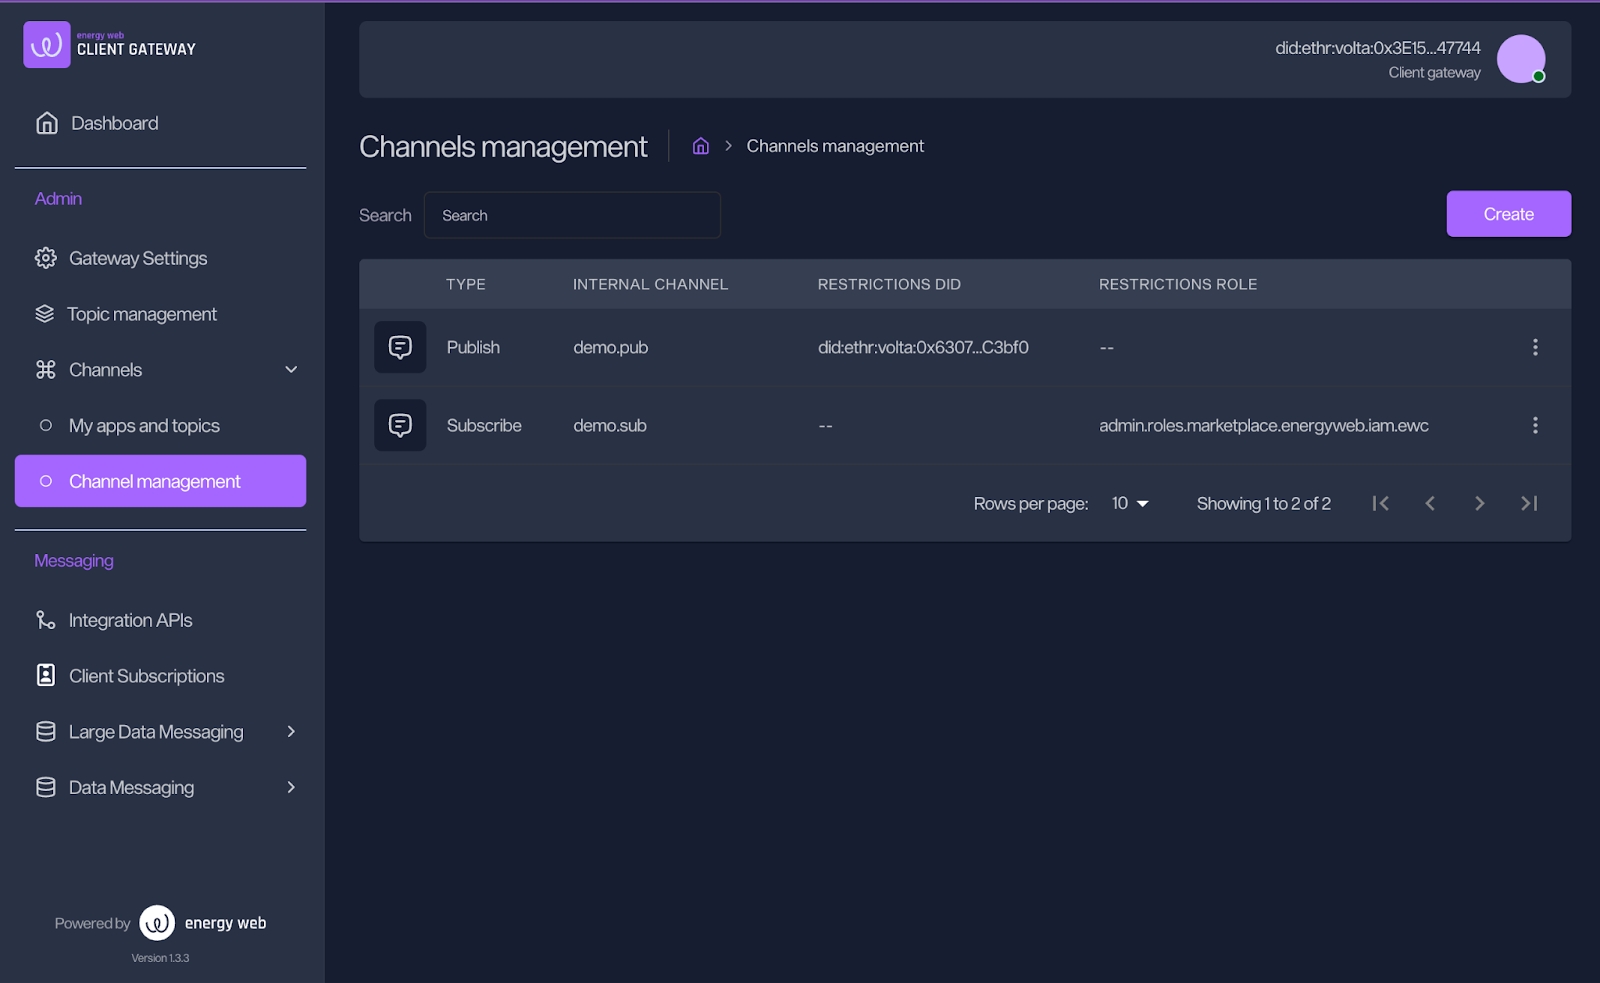
We should have both channels shown under ‘Channel management’
This is all about channel creating and how to implement a topic.
5. Demo Integration - test Sending / Receiving data.
The above video demonstrates client A (DID ends 49Cc9) sends a message by API to client B (DID ends 64946), and client B successfully retrieved the message by API.
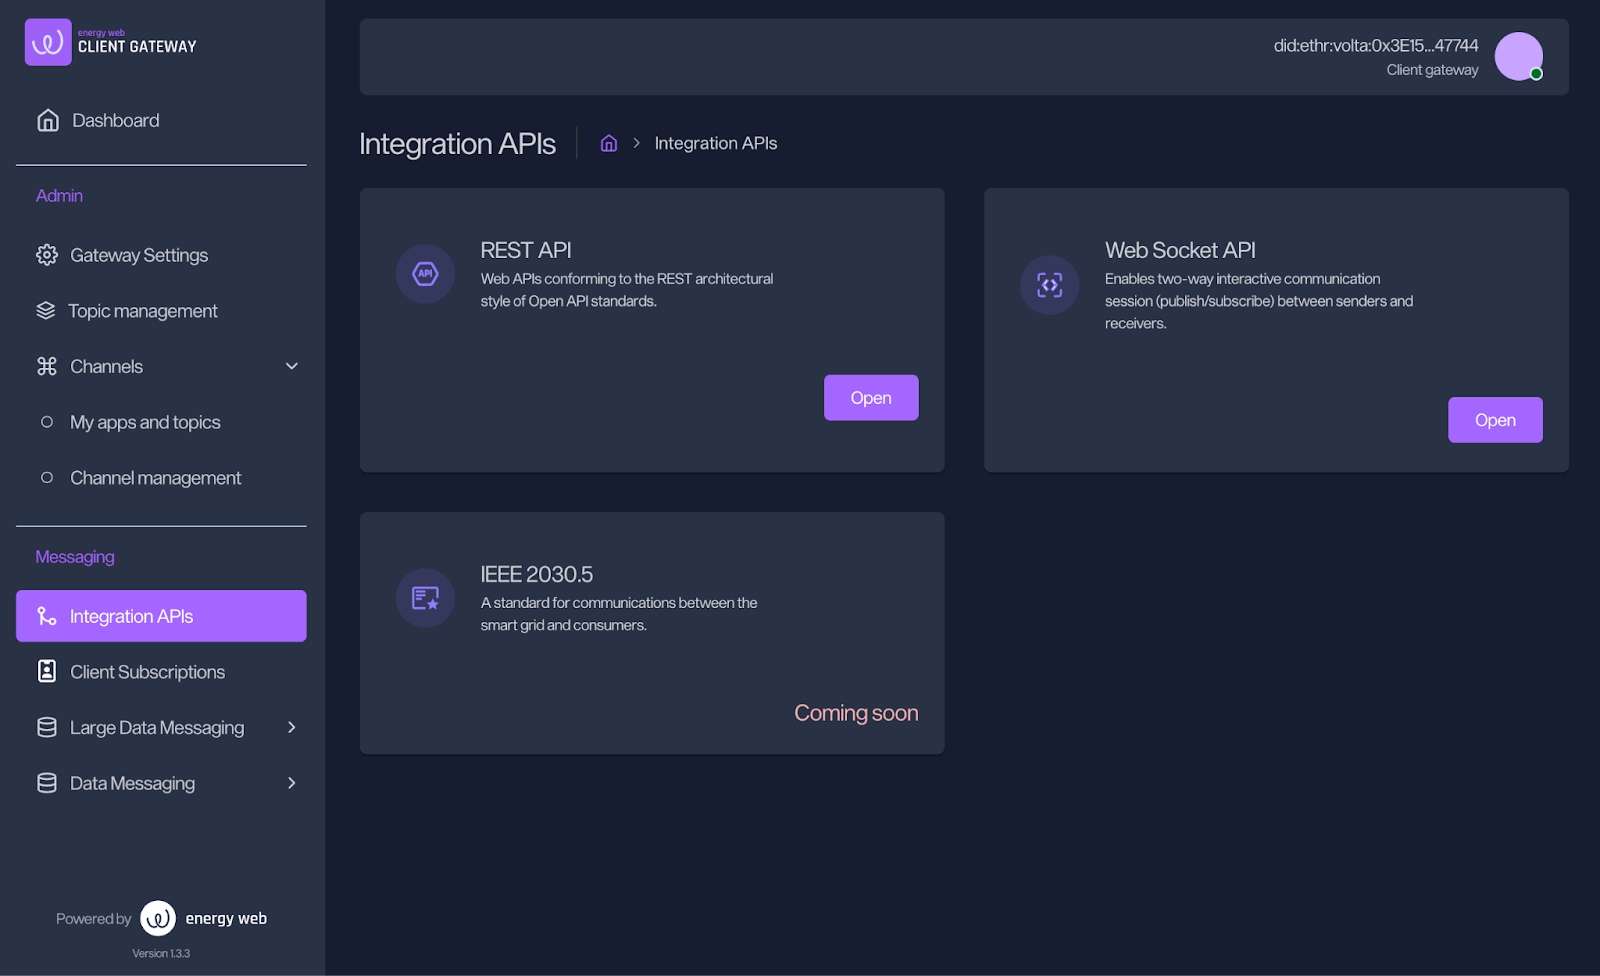
The Digital Spine Integration Client has an API swagger page, which shows you the list of endpoints available for integration.
You can access the swagger integration APIs page from ‘Integration APIs’ from the left side nav.
Click ‘Open’ Rest API.
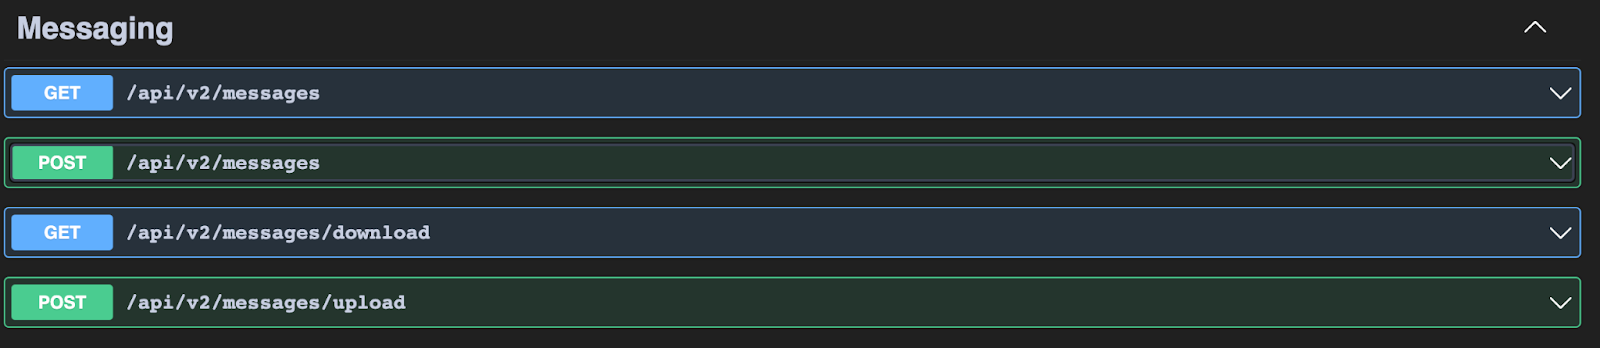
On the swagger page, scroll down to the ‘Messaging’ section
You can find detailed information about how to integrate with those endpoints.
5.1 Example Post data to a Channel
To post a message to the newly created ‘demo.pub’ channel, the example payload will be formatted as shown below:
You can POST above payload to the D.S.I Client’s endpoint `/api/v2/messages`
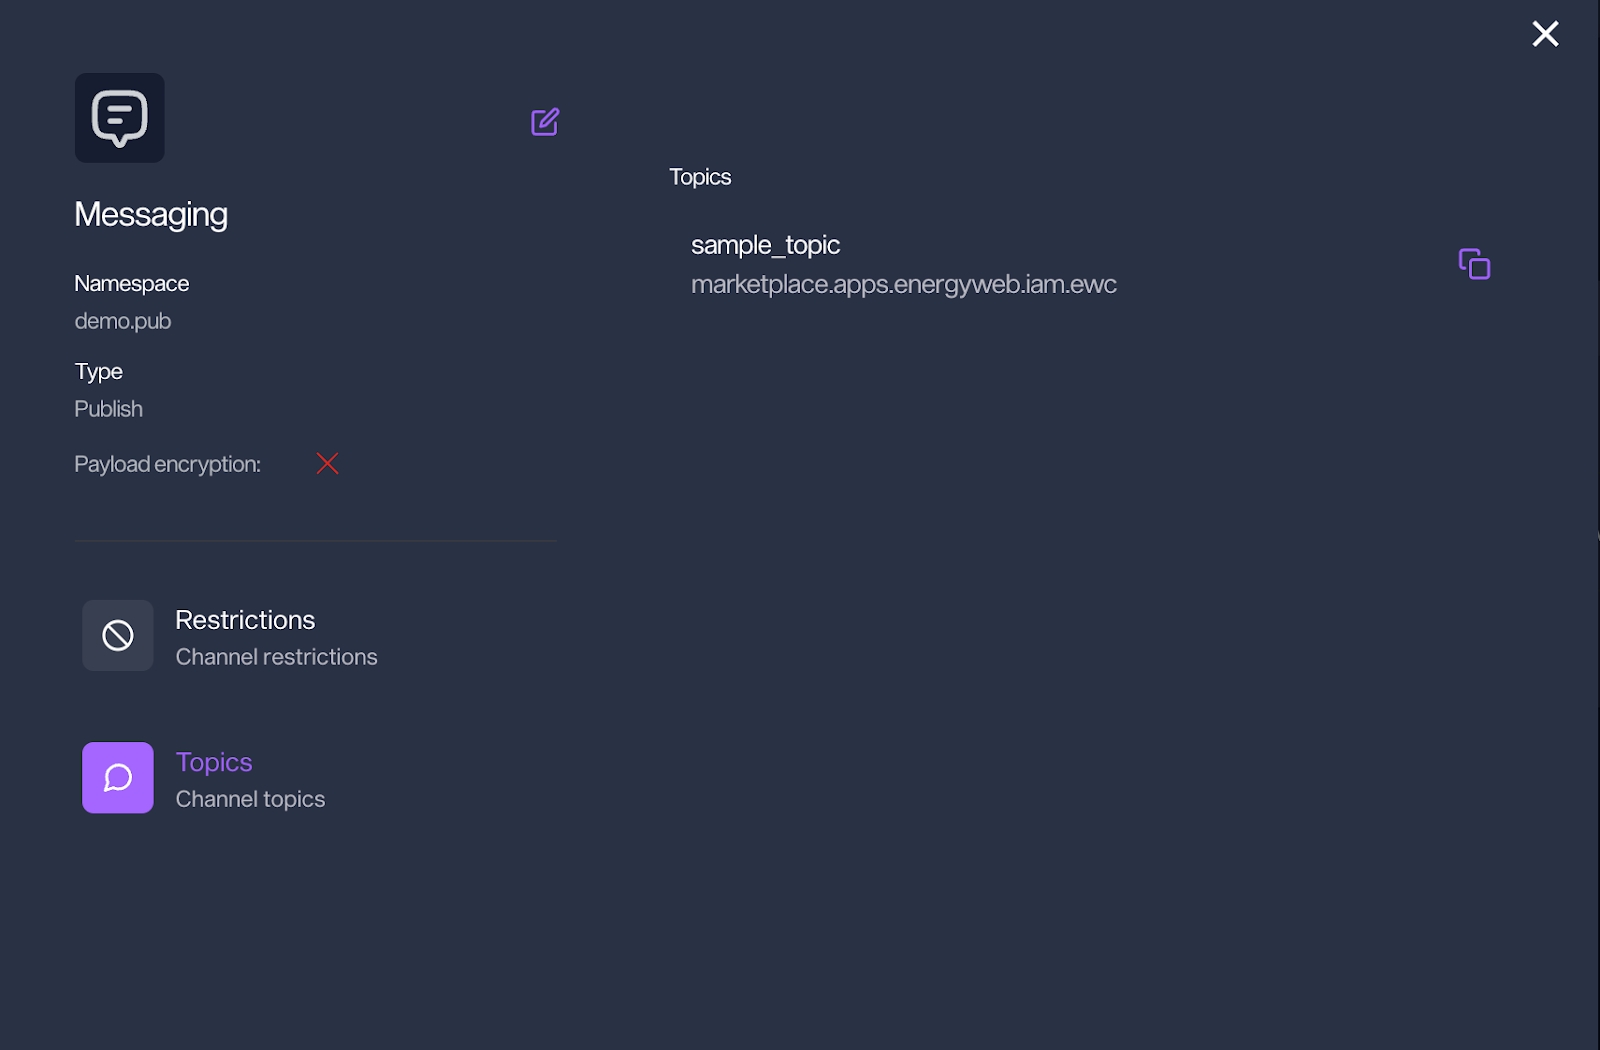
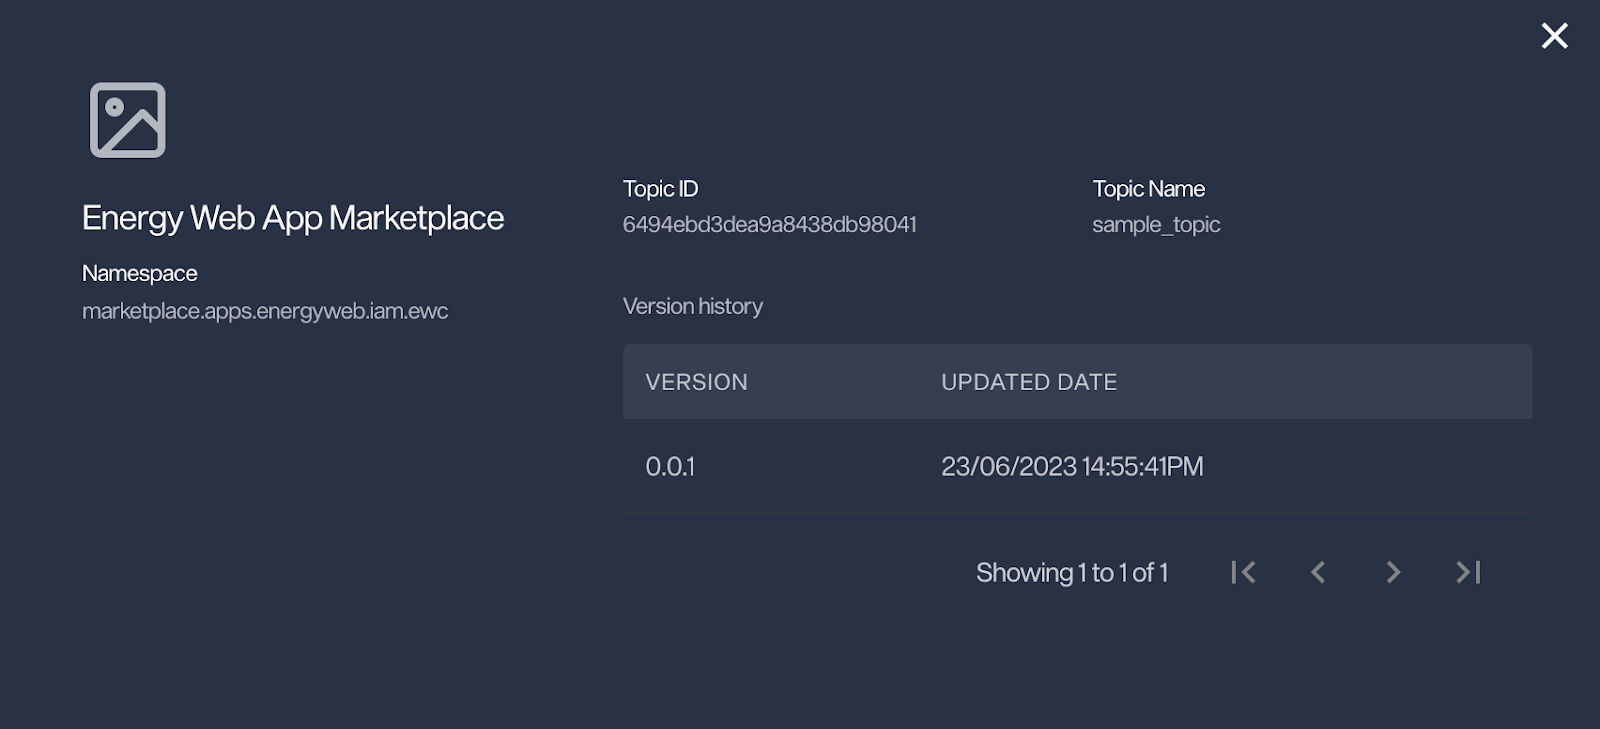
You can get all the payload info from the channel details on the D.S.I Client’s UI, click to open the 'demo.pub' channel from the channel list under ‘Channels’ > ‘Channel management’
Here are the channel and topic details
So payload info has below relationship with what is shown on the channel detail and topic detail modals.
| Payload field | UI label | Value |
|---|---|---|
fqcn | Namespace on Channel details |
|
topicName | Topic Name |
|
topicVersion | Version on Topic details |
|
topicOwner | Namespace on Topic details |
|
5.2 Example Get data from a Channel
To receive data from a channel, by following the documentation, You can retrieve data from GET endpoint '/api/v2/messages'
An example request path can be /api/v2/messages?fqcn=demo.sub&amount=10&topicName=sample_topic&topicOwner=marketplace.apps.energyweb.iam.ewc&clientId=demo_user
Query breakdown will be
fqcn = demo.sub
amount = 10
topicName = sample_topic
topicOwner = marketplace.apps.energyweb.iam.ewc
clientId = demo_user
The query information can also be retrieved from the channel detail as explained in the previous step.
6. Conclusion
Those are the main steps to get you started with the Digital Spine Integration interface, You can start communicating with other DSI clients integrated with the same application.
And contact us at digital-spine.support@energweb.org to acquire the 'topiccreator' role to create topics to test scenarios based on your business requirement.
Last updated